
In the previous blogs we looked at high level architecture of Kubernetes, and also how to create a Kubernetes cluster in Google Cloud and in a local environment (using Minikube or Kind).
In current blog we will deep dive into one of the main Kubernetes object – Pod. We will see
- what Pods are
- life-cycle of pod
- intra-pod and inter-pod networking
- how can we create a pod and deploy our application inside it
- how to get running pods information using
kubectlcommand, and also how to connect to a pod from our local terminal.
We assume you know how to create a cluster (local or on cloud), and also know how to run
kubectlcommand to connect to a cluster.
In case you are not aware of it, you can refer to the previous blogs in this series.
– Running Kubernetes cluster on local machine using Minikube or Kind
– How To: Create first Kubernetes cluster on Google Cloud and connect to it from local machine using kubectl
The commands and examples used in this blog will work with either a local cluster or a cloud cluster.
1.0 What is a Pod
- Pods are the smallest deployable units of computing that you can create and manage in Kubernetes.
- Pods run inside
nodes. Each node can have many pods running inside it.

Virtualization does VMs
Docker does containers
Kubernetes does Pods.
2.0 Single vs multi-container pod

Single Container Pod
- The “one-container-per-Pod” model is the most common Kubernetes use case.
- In this case, you can think of a Pod as a wrapper around a single container.
- Kubernetes manages Pods rather than managing the containers directly.
Multi-Container Pod
However, there are advanced use-cases that run multiple containers inside a single Pod. e.g.
— Service meshes
— Web containers supported by a helper container that pulls the latest content
— Containers with a tightly coupled log scraper
Multi container pods will share the resources of the pod. e.g following resources will be shared
— IP Address / Hostname
— Ports
— Sockets
— Memory
— Volumes, etc
3.0 Pods Networking
Intra Pod Communication
- Containers within the pod can talk to each other via
localhost - These pods share the same network space, which means
- a single IP address,
- a single range of TCP and UDP ports,
- We cannot have two containers running on same port within a same pod (to avoid port binding error)
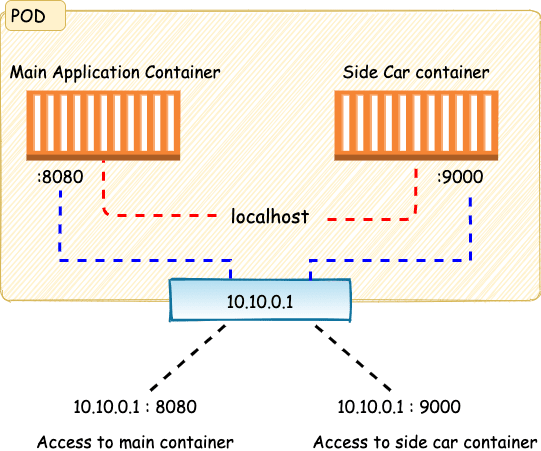
In above picture the pod has a Private IP – 10.10.0.1, and it is exposing port 8080, and port 9000 over this IP Address to provide access to the application container and the side car container. However internally both containers can access each other over localhost.
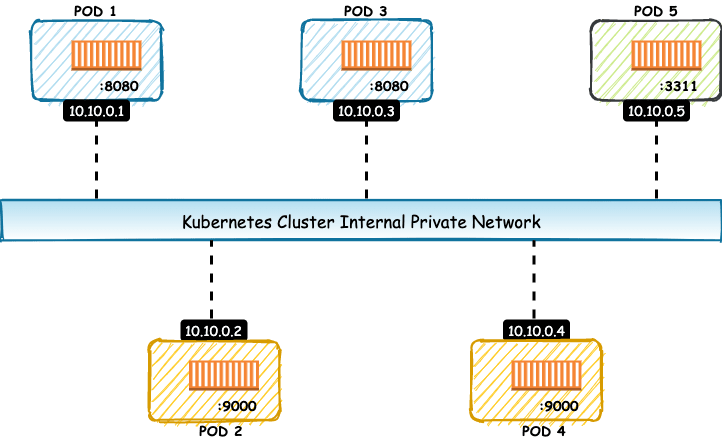
Inter Pod Communication
- Since each pod gets its own Private IP address within the Kubernetes cluster, the inter pod communication can happen over the IP Address.
- Also the containers can run on same port, as long as they are running in different pods (as IP address are different)
4.0 Life cycle of a pod
Pods are mortal.
- They’re created, they live, and they die.
- When a pod dies, Kubernetes does not tries to bring it back to life. Instead it starts a new pod in its place.
- Even though the new pod may look and feel just like the old one – it is still a completely new pod with new IP Address.
A pod pass through various stages in its life cycle
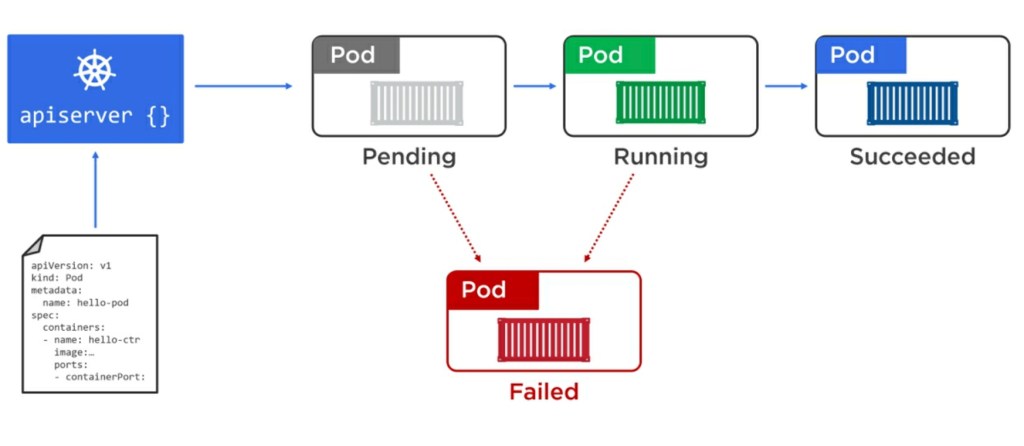
The pod lifecycle starts when a user posts a POD creation YAML manifest file to the API server, and the Pod is scheduled to one of the healthy node by the Scheduler.
- Pending
- Once it’s scheduled to a node, it enters the pending state while the container runtime on the node downloads images and starts any containers.
- The Pod remains in the pending state until all of its resources are up and ready.
- Running
- Once everything’s up and ready, the Pod enters the running state.
- Succeded
- Once it has completed all of its tasks, it gets terminated and enters the succeeded state.
- Failed
- It can go from Pending to Failed state, if the pod creation fails due to some reason.
- It can go from Running to Failed state, if pod/application crashes due to some reason.
5.0 How to deploy a pod to the cluster
The deployment of a Pod is an atomic operation.
- This means that a Pod is only considered ready for service when all of its containers are up and running.
- There is never a situation where a partially deployed Pod will service requests.
- The entire Pod either comes up and is put into service, or it doesn’t, and it fails.
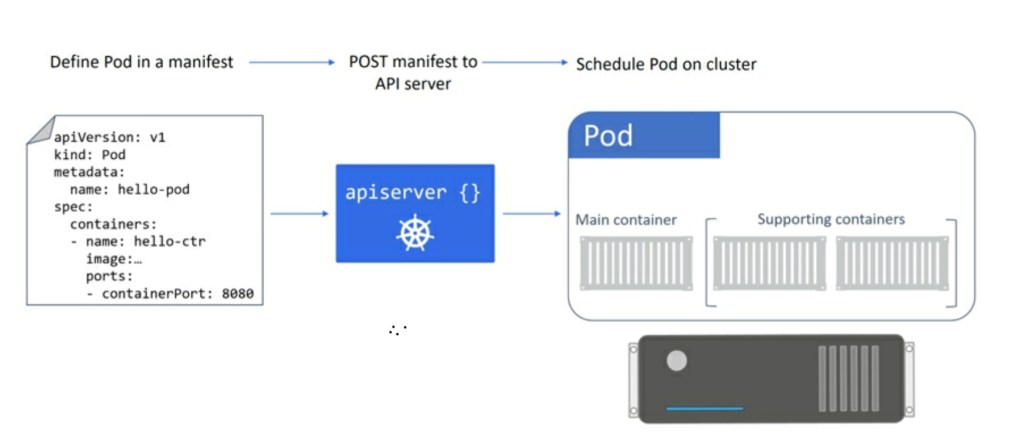
Following is a typical workflow of creation of pod
- Create a manifest file (YAML), which contains our desired state of the pod.
- Post the manifest YAML file to the API server.
- Control plane will validate the YAML file, and write it to cluster storage
- Scheduler will find a healthly node to run the pod
- Pod will get created and application will start running
In this blog we will demonstrate 2 approaches to create a pod – directly and via replica set.
However both are not recommended ways to create a pod.
Pods should always be created using a Controller ( Deployment, Job, or StatefulSet)
The reason we are demonstrating them first, so that we understand the issues with them, and understand in a better way why do we need to deploy a pod via controller like Deployment.
5.1 Deploying a singleton pod
There are multiple ways to deploy a pod. We will start by seeing how to deploy a Singleton pod – just a single pod with no replica, etc.
First we will need to create the POD manifest file (which will look something like below)

Refer to the Kubernetes API Reference of pod-v1-core, for more information on Pod Specification.
Save this pod manifest into a yaml file (e.g nginx-pod-01.yaml), and run below kubectl command to deploy the pod.
kubectl apply -f <yaml file> 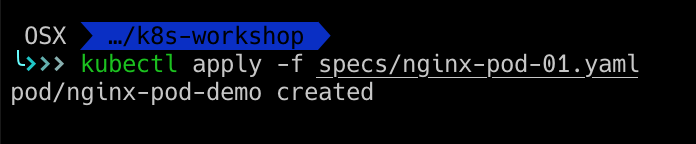
Run command kubectl get pods -o wide , to get the running pod information.

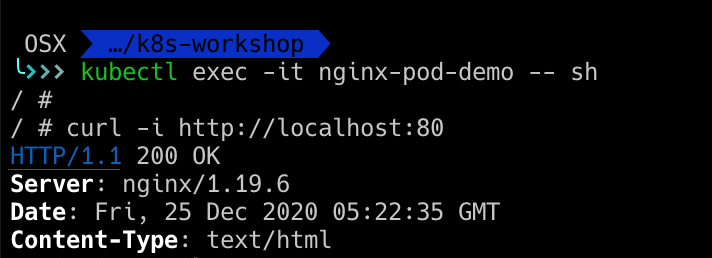
Now how do we verify if NGINX application is actually running or not? We cannot access this application from outside the cluster (as that will require additional objects to be created).
For now, we will directly access the pod and hit url http://localhost:80 to check if application is running on which the pod is running. We can do so by running command kubectl exec -ti <pod-name> -- <command-to-run>
e.g.
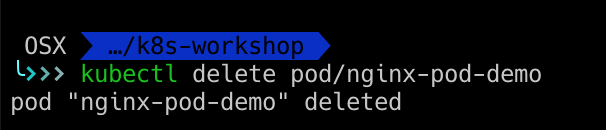
You can delete the pod using command kubectl delete pod/<pod-name>. e.g.
5.2 Deploying pods via Replica sets.
Although we were able to create a pod easily using Pod object, but there is one big problem with that approach — Singleton pods only allow creation of 1 pod.
What if we wanted to run 3 instances of nginx server? With above approach, we will have to do following
— create 3 pod yaml files
— change the name of pod to make it unique for each pod (e.g nginx1, nginx2, nginx3, etc)
— Run command kubectl apply 3 times, one for each pod yaml
As you might have felt, it is very very cumbersome approach and won’t scale if we have to run multiple instances of many applications.
Kubernetes provides another object ReplicaSet to providing scaling for pods. This is how the YAML definition would look like
apiVersion: apps/v1
kind: ReplicaSet
metadata:
  # Unique key of the ReplicaSet instance
  name: nginx-replicaset-demo
spec:
  # no. of replicas that should exist all time.
  replicas: 3
  # Selector is a label query over pods that should match the replica count.
  # Label keys and values that must match in order to be controlled by this replica set.
  # It must match the pod template's labels.
  selector:
    matchLabels:
      app: nginx
      ver: 1.19.6
  # pod template below
  template:
    metadata:
      name: nginx-pod-demo
      labels:
        app: nginx
        ver: 1.19.6
    spec:
      containers:
      - name: nginx-server
        image: nginx:1.19.6-alpine
        ports:
        - containerPort: 80
Refer to the Kubernetes API Reference of replicaset-v1-apps, for more information.
Lets deploy this replica set now, using the same kubectl apply command.
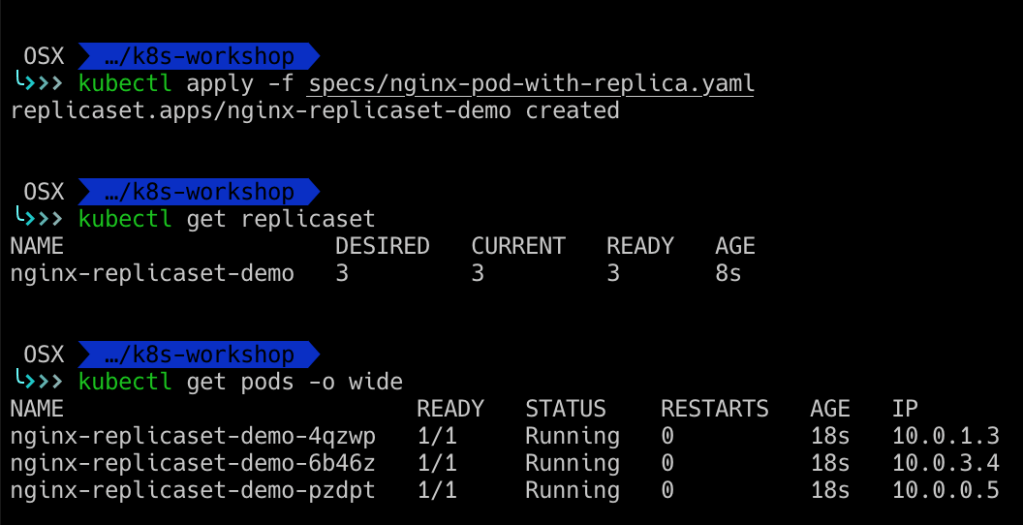
You can run command kubectl get replicaset, to get replicaset information, and you can delete the replicaset using command kubectl delete replicaset/<name>

Before we wrap up, can you think of any issues with deploying a pod using replicaset?
Although it provides us with scaling, it does not provides us with Upgrades/Rollbacks.
— what if i have deployed a replicaset with version V1 of app, and now i want to upgrade to version V2 of app?
— Doing so would require us to manually delete V1 replicaset, and create a new replicaset with V2 version of app
— As you might have guess this is not so feasible in deploying application upgrades and also to do rollbacks if required.
Although we saw 2 approaches to create a pod – directly and via replica set, both of them have their shortcomings. The most recommended way to create a pod is via Deployment.
We will cover Deployments in our next blog of this series.

Hi suneet … Thanks for writing informative post .
LikeLike