
In this post we will see how to do rolling deployments and rollbacks for applications deployed in a Kubernetes cluster.
1.0 Introduction to Deployments
In our previous post we saw how to create an application pod, using Pod and ReplicaSet. It lacked ability to do upgrades and rollbacks on application.
- Deployments adds following capabilities to a pod
— scaling – If a Pod managed by a Deployment sees increased load, you can easily add more of the same Pod to deal with the load
— self-healing – If a Pod managed by a Deployment fails, it will be replaced.
— rolling updates – you can upgrade the pods to newer version of application, and also rollback to older versions.
- We should always deploy Pods via a Deployment controller.
- A single Deployment object can only manage a single Pod template.
e.g. if you have an application with a Pod template for the web front-end and another Pod template for the catalog service, then you’ll need create two Deployments.
- Deployments are fully-fledged objects in the Kubernetes API — this means we can define them in manifest files that you POST to the API Server.
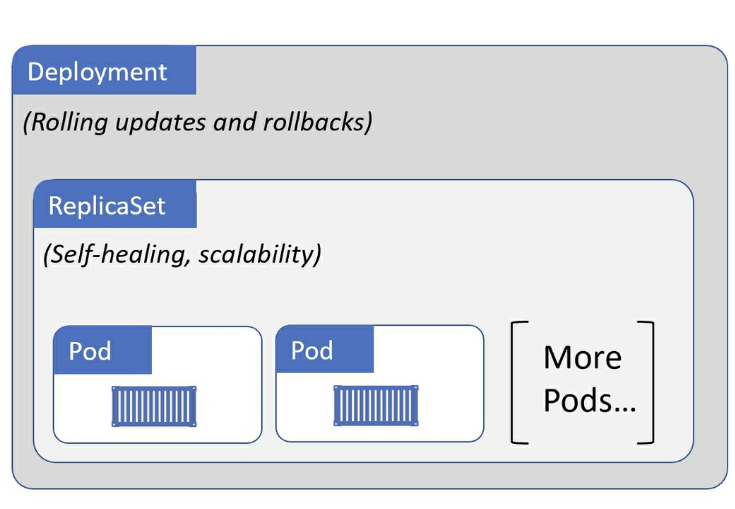
- We can think of
Deploymentsas managingReplicaSets, andReplicaSetsmanagingPods.
2.0 Deploying an application using Deployment Controller
In this post we will use an image –
chatterjeesunit/dummy-app, which is a very simple Spring Boot application (using H2 database).
This is how a typical Deployment configuration YAML will look like
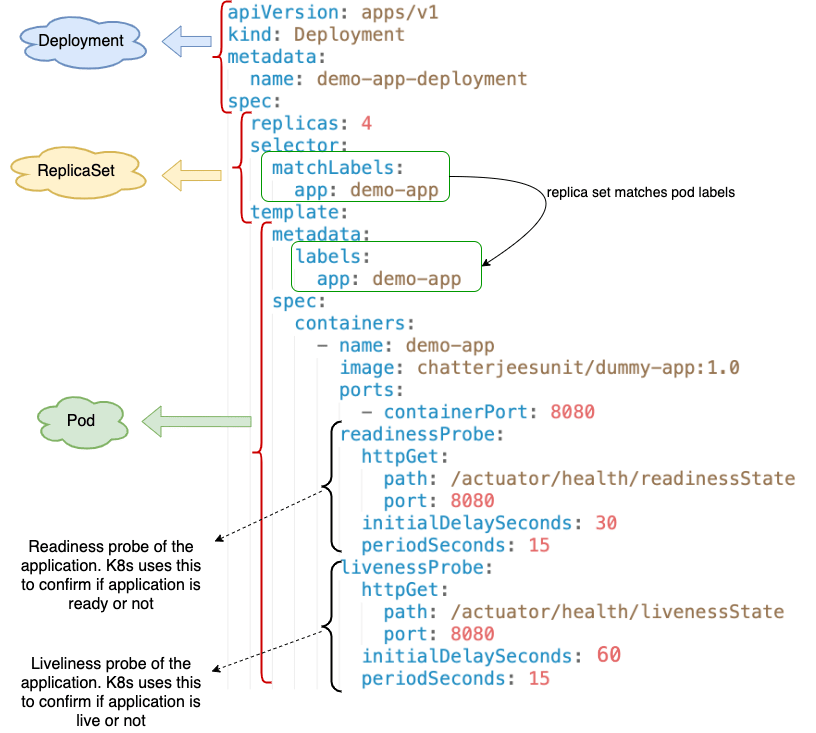
Few important sections of the yaml file are,
- At the top we have
Deployment, which
— provides a unique deployment name.
— containsReplicaSet. ReplicaSetcontains
— # of replica.
— match labels for pods.
— contains thePodtemplate.Podtemplate
— provides name of pod.
— container image for the application.
— readiness/liveness urls of the application – probes start afterinitialDelaySeconds, and are repeated everyperiodSeconds.
| Readiness | Liveness |
|---|---|
| – whether application is ready to recieve incoming traffic or not. | – whether the application is still alive or not. |
| – Kubernetes checks for application readiness on pod startup, before redirecting incoming traffic to the pod. | – Kubernetes keeps checking liveness throughout the lifetime of pod, to ensure pod did not crash or die. If liveness check fails then pod is restarted. |
Let us deploy the pods using the above deployment spec using command – kubectl apply -f <file-name.yaml> --record=true
e.g.
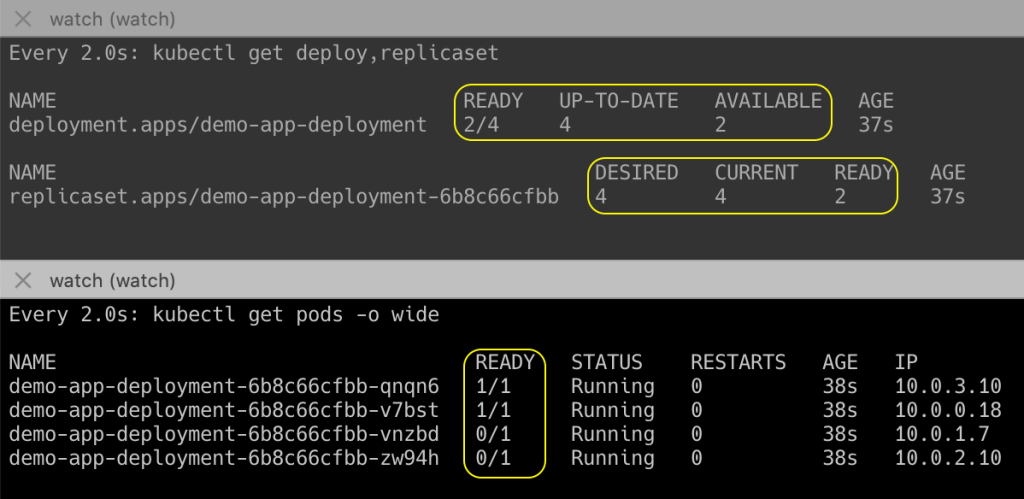
kubectl apply -f specs/deploy-app.yaml --record=trueInitially you may see an output like this when you fetch pod / replicaset / deploy information (pods are created but not ready)
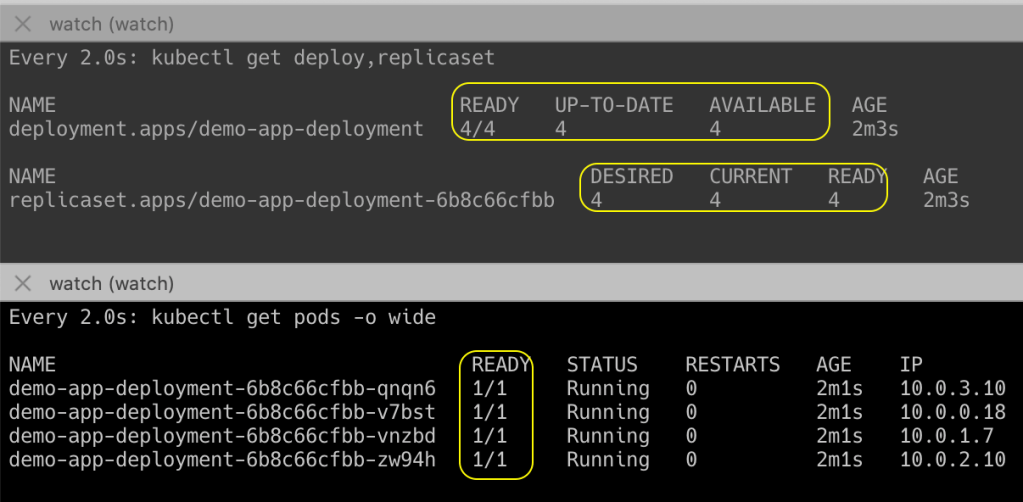
Later, when Kubernetes receives the readiness signal from all pods, you will see output like this
3.0 Accessing application outside of cluster
So now we have our V1.0 application running succesfully inside the cluster.
Before we move ahead with upgrades and rollbacks, lets verify the application version deployed.
The demo application that we have used –
chatterjeesunit/dummy-app, is an Spring Boot application that exposes the current version info into the actuator url –/actuator/info
Run following command to expose your application outside the cluster
kubectl expose deployment <name> --type=LoadBalancer --port=<application-port>e.g.
kubectl expose deployment demo-app-deployment --type=LoadBalancer --port=8080If you are running a local cluster using minikube, then run one more command on a separate terminal and keep it running –
minikube tunnel
Next get the External IP Address of the app by running command – kubectl get service <service-name>

Access the application url on external IP and port.
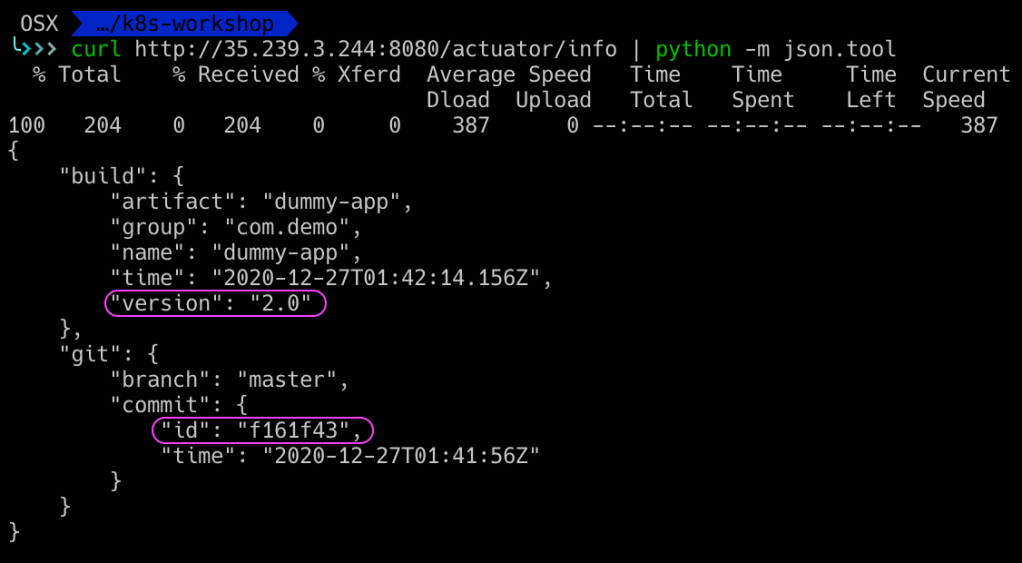
e.g – http://35.239.3.244:8080/actuator/info
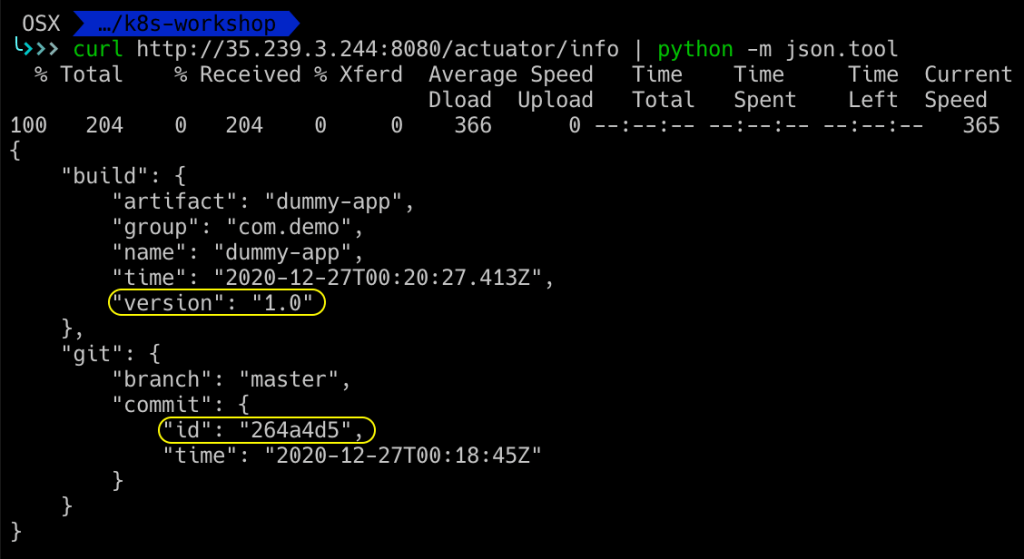
As you can verify from the output, version 1.0 of app is deployed currently on the cluster.
4.0 Performing rolling upgrades
Now suppose we want to upgrade your application from V1.0 to V2.0. What do we do?
We change the container image version from 1.0 to 2.0, in same deployment spec, and re-deploy it using kubectl apply -f command.
That’s all we need to do to redeploy new version of app in a rolling update fashion.
What does Kubernetes do to ensure rolling update happens
- It creates new
ReplicaSetfor the new pods. - Slowly terminates pods in old
ReplicaSet, and creates new pods in newReplicaSet - Eventually old
ReplicaSetwill have 0 pods. - Rate at which pods are terminated and created is controlled by configuration properties –
maxSurge, andmaxUnvailable
—maxSurge– Total no. of pods that can be scheduled at any given time (old + new ReplicaSet).
e.g if desired pods = 8, andmaxSurge= 25%, then max pods at any time = 10 (= 1.25 * 8)
—maxUnvailable– maximum number of pods that can be unavailable at any given time.
e.g. ifmaxUnavailableis 25%, then maximum pods terminate at a time will be 25% of the desired pods.
Deployment strategy available are
RecreateorRollingUpdate.
By default the update strategy of deployment isRollingUpdate(withmaxSurge = 25%, andmaxUnvailable = 25%).
Let us upgrade our application using this deployment spec (overriding the default strategy)
apiVersion: apps/v1
kind: Deployment
metadata:
  name: demo-app-deployment
spec:
  replicas: 4
  strategy:
    type: RollingUpdate
    rollingUpdate:
      maxSurge: 50%
      maxUnavailable: 25%
  selector:
    matchLabels:
      app: demo-app
  template:
    metadata:
      labels:
        app: demo-app
    spec:
      containers:
        - name: demo-app
          image: chatterjeesunit/dummy-app:2.0
          ports:
            - containerPort: 8080
          readinessProbe:
            httpGet:
              path: /actuator/health/readinessState
              port: 8080
            initialDelaySeconds: 30
            periodSeconds: 15
          livenessProbe:
            httpGet:
              path: /actuator/health/livenessState
              port: 8080
            initialDelaySeconds: 60
            periodSeconds: 15
Run the same kubectl apply -f ... command, to upgrade the deployment.
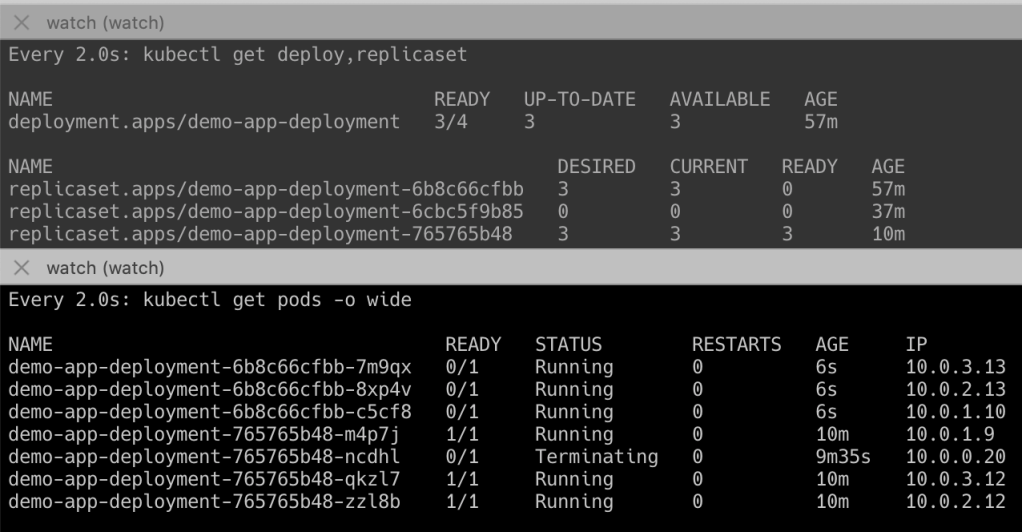
After you deploy the application you can see that pods will start getting terminated in old ReplicaSet, and created in new ReplicaSet
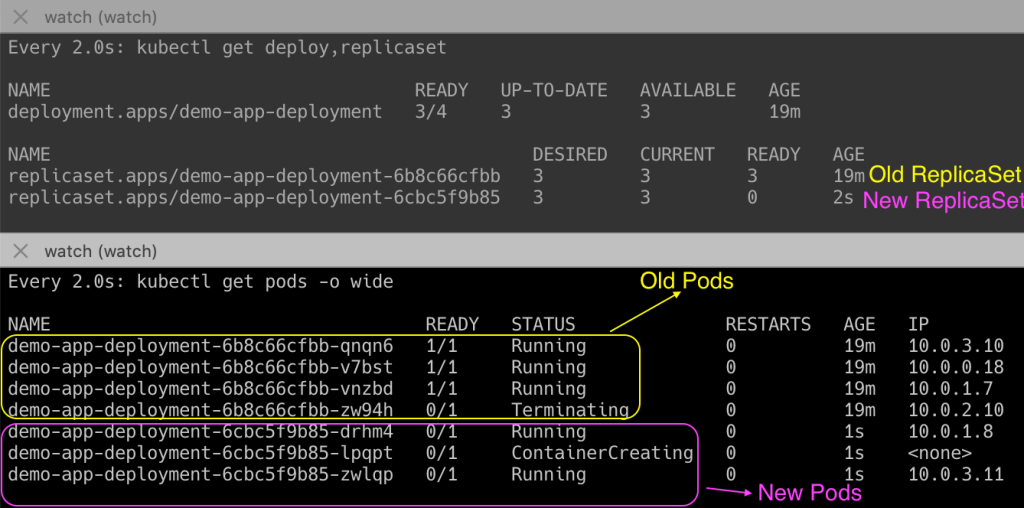
As you can see from above,
— Total number of Ready pods = 3, unavailable pods = 1.
This is so because maxUnavailable is 25% (0.25 * 4 = 1)
— Total no. of pods = 6.
This is because maxSurge = 50% (1.5 * 4 = 6)
You can also view status of rollback using command – kubectl rollout status <deployment-name>
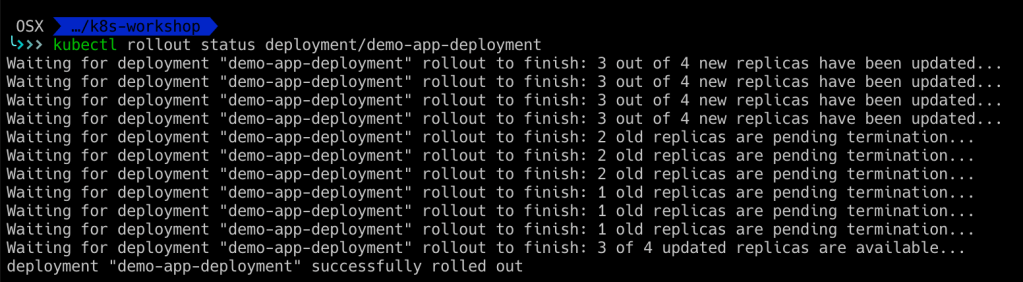
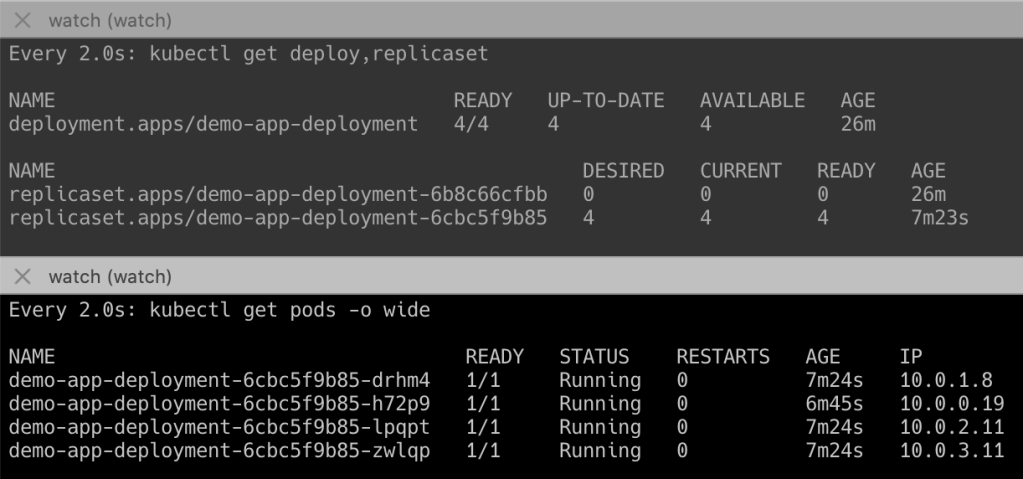
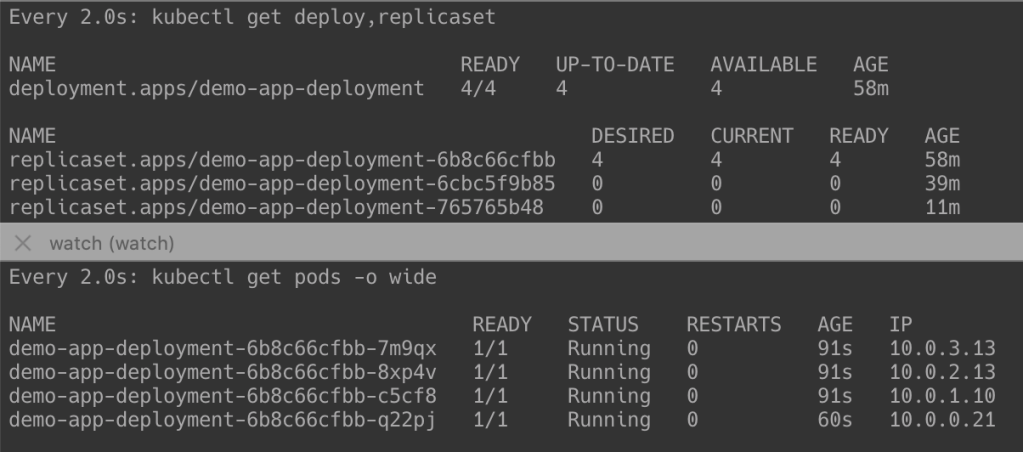
Once the deployment completes, you can see something like this below (i.e., pods in old Replicaset = 0)
Lets verify the upgrade by hitting the application actuator url again. You should see version 2.0 in actuator info.
5.0 View deployment history
So far we have seen how to deploy and upgrade our application.
But how do we view all the upgrade history?
We can do so by running the command – kubectl rollout history <deployment-name>.
e.g.
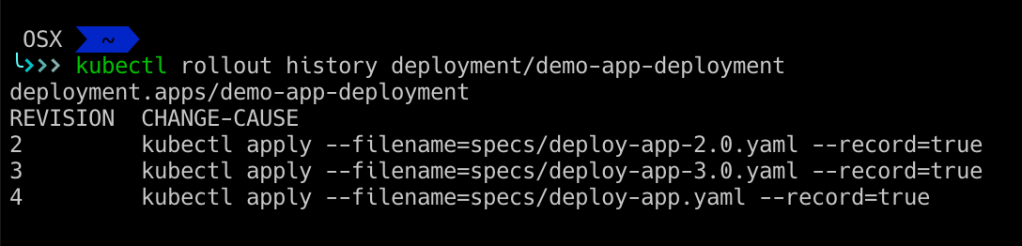
kubectl rollout history demo-app-deployment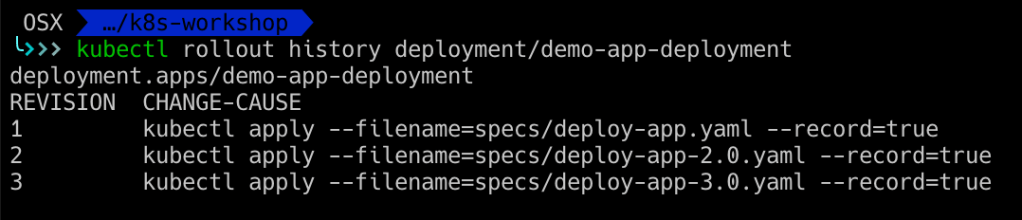
I had done one more upgrade from 2.0 to 3.0, hence 3 revisions are seen in my rollout history.
The column
CHANGE-CAUSEcontains the command that was used to deploy the application, and is captured only ifkubectl applycommand was run with flag--record=true.
Else it will be empty always.
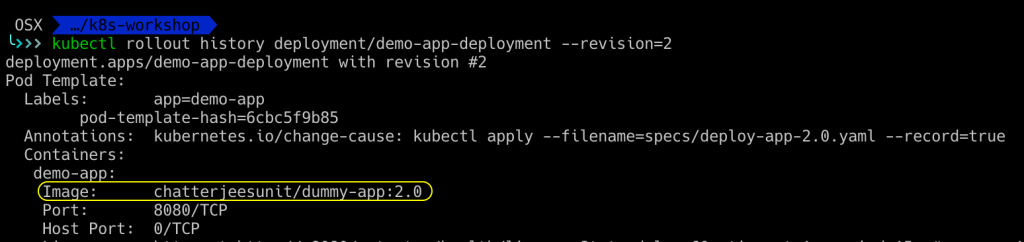
As you can see that the rollout history does not gives us information about which container image was deployed during the deployment (we cannot get that information from revision or change-cause).
We can get that information by providing --revision flag in the kubectl rollout history ... command.
6.0 Performing rollbacks of deployments
To rollback to any older version of app, we need to first decide which revision to rollback to.
As we saw earlier, we can get all revisions from the kubectl rollout history ... command.
You can rollback the deployment to any particular revision using command – kubectl rollout undo <name> --to-revision=<revision-number>
e.g.
kubectl rollout undo deployment/demo-app-deployment --to-revision=1 Lets see what happens when we rollback our app from revision 3 to revision 1.
We can see that pods are terminated in newer ReplicaSet, and are created again in the older ReplicaSet.
You can also view status of rollback using command – kubectl rollout status <deployment-name>

Once the rollback is complete, there will be 0 pods in the new ReplicaSet.
The original revision is now not shown in the rollback history (instead of revision 1, 2, 3, now you see 2, 3, 4 after rollback)
You can also verify by hitting the /actuator/info url of the application to confirm if it is indeed 1.0 version of application running.
