
In our previous blog, we created a local Kubernetes cluster using Minikube or Kind. In this blog we will see how to create a cluster in Google Cloud using GKE (Google Kubernetes Engine), and connect to it from our local machine using kubectl.
Table of Contents
- 1.0 Understanding Cost Concerns
- 2.0 Create cluster on Google Cloud
- 3.0 Connecting to cluster from local machine using kubectl
1.0 Understanding Cost Concerns
In last blog, we created a local Kubernetes cluster using Minikube or Kind. But its nothing like working in real cluster hosted on Cloud.
So why am I even talking about cost first, instead of creating a cluster?
Because that was my first worry when i decided to get my hands dirty on a real cluster on Cloud. I was worried how much would it cost me.
Nobody wants to have huge bills at end of the month, especially when you have to pay out of your own pocket.
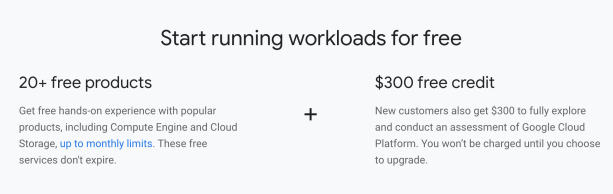
1.1 Start with 300$ initial credit, and few free products with limit.
If you create a new account on Google Cloud, it provides you a 300$ credit to spend over 90 days. That’s lot more than we will require to build our cluster and play around on it.
It also provides free Compute Engine/ Cloud Storage (of course within some specified limits and usage).
For me it was more than enough, as in my local currency (INR) it amounted to around 21K INR.
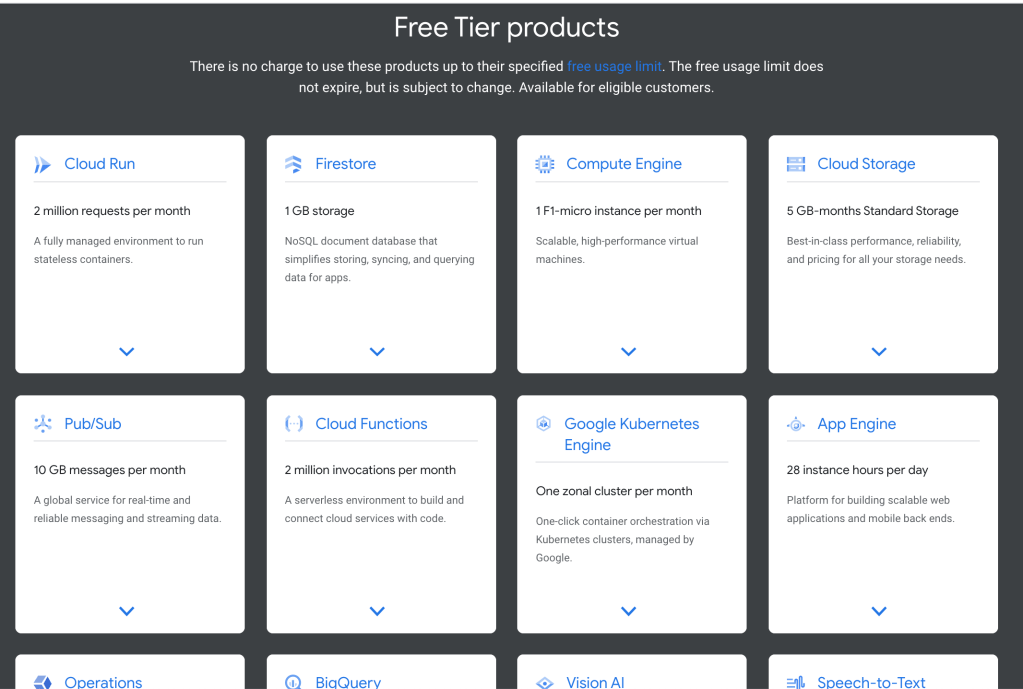
Some of the free products (with limits) are as below. You can go to https://cloud.google.com/free, to find more details.
1.2 Evaluate cost using pricing calculator and decide on your usage.
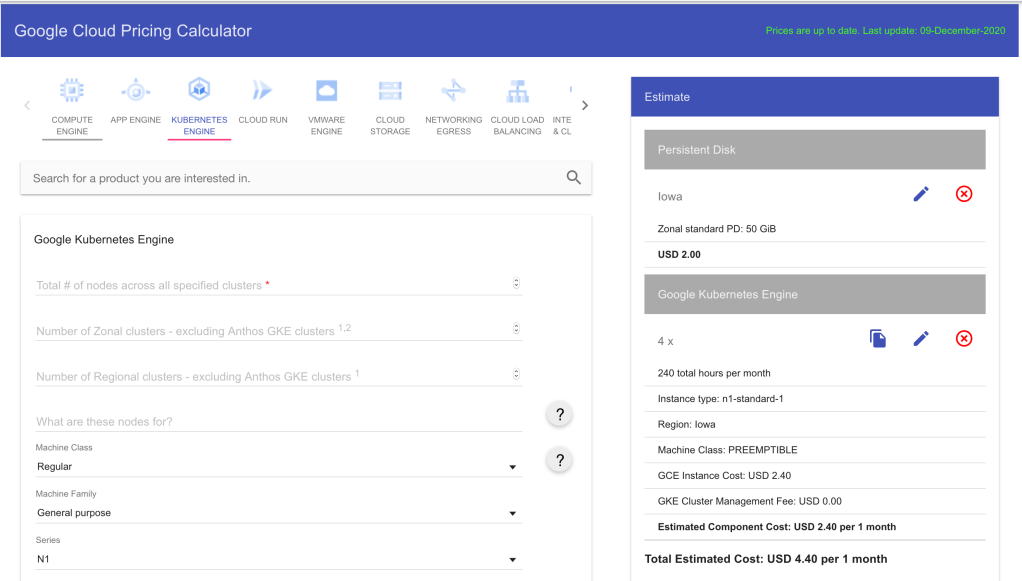
Even though you may have free usage credits, its always a good idea to start with Pricing Calculator and plan you usage and costs.
First of all identify your requirements – My requirement was to build cluster on Google Cloud was for self learning purpose. I DID NOT need a cluster that needs powerful Compute engines or big Storage, and I definitely didn’t needed it to be running 24 hrs a days.
So i went to Google Cloud Price Calculator, and evaluated the price with different options of region/ compute engine/ storage – depending on my self learning budget.
What can you do to reduce cost (mainly for clusters that do not need high compute power or 24hrs uptime)
- Number of nodes: Reduce the number of nodes you create in cluster. I started with 4 nodes.
- Zonal vs Regional Cluster – Start with just 1 zonal cluster
- Operation system for machines: Choose Free Operating System instead of Paid ones
- Machine Class – Choose
PreemptibleoverRegular– the cost different will be substantial.
Preemptible VMs are not fault tolerant and can be interrupted, but they suited my requirement. - Machine Type: Choose General Purpose machine with low CPU and RAM (unless you have specific requirements for high computation power).
e.g Choose astandardorsmallormicroconfiguration instead ofmediumorhigh-memorhigh-cpu.
There are different types of machines available, and you can choose something that meets your budget.
When i started on Google Cloud, my initial requirement was
– 4 node cluster in 1 zone
– Preemptible General Purpose Node of type n1-standard-1 (vCPUs = 1, RAM = 3.75GB)
– Max 50 GiB Standard storage
– Estimated usage of just 60 hrs of usage ( over a month)For this my estimated usage was just less than 5 USD.
You can decide on the right configuration as per your budget and requirements.
2.0 Create cluster on Google Cloud
Now that we have taken care of cost factor, lets get to the business of creating the cluster on Google Cloud.
2.1 Create a Project
First of all we will need to create a project on Google Cloud.
Go to Google Cloud Console, login to your google account and create a new project.
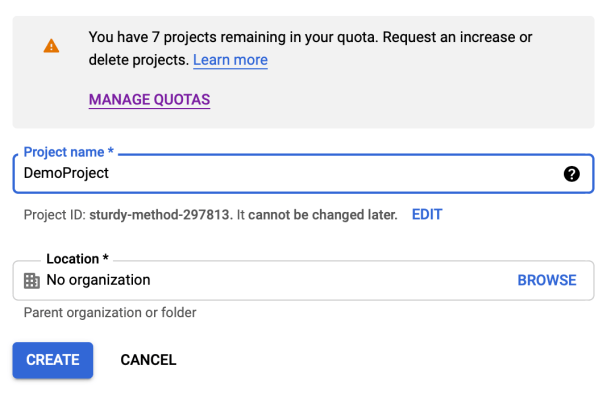
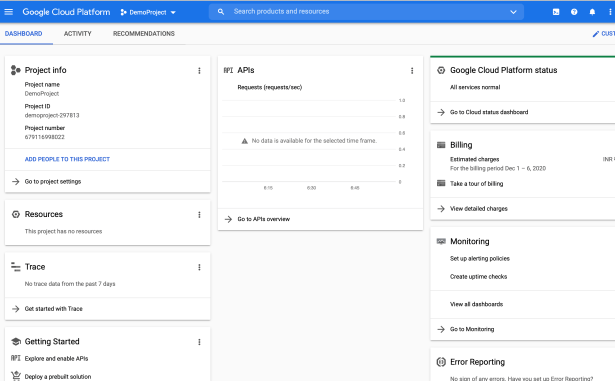
Once the project is created, you will see something like this below.
2.2 Create the cluster
Next step is to create the cluster.
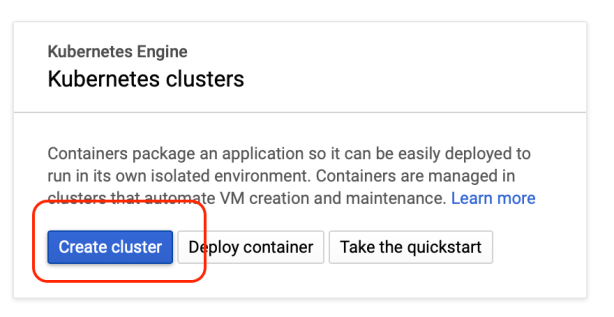
Go to Menu on top left -> Kubernetes Engine -> Clusters

And create a new cluster.
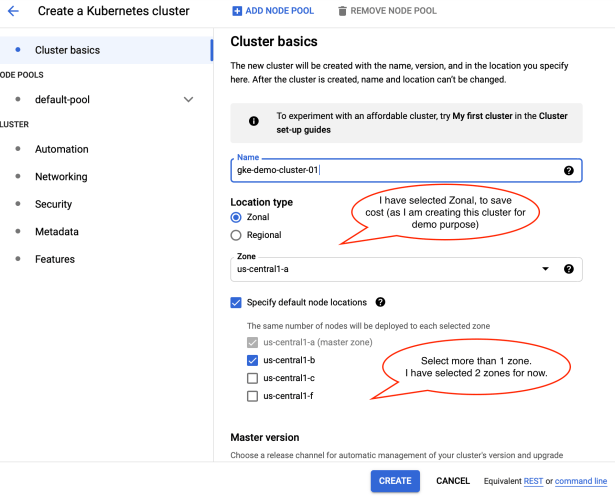
Fill in the details for the cluster
– Cluster Name
– Location Type – Zonal vs Regional
– Select zones on which you want the nodes to be deployed. Each zone will have same number of nodes.
DON’T click on “Create” button to create the cluster as of now – we will need to configure few other options. If you click Create now it will create the cluster nodes with default configuration.
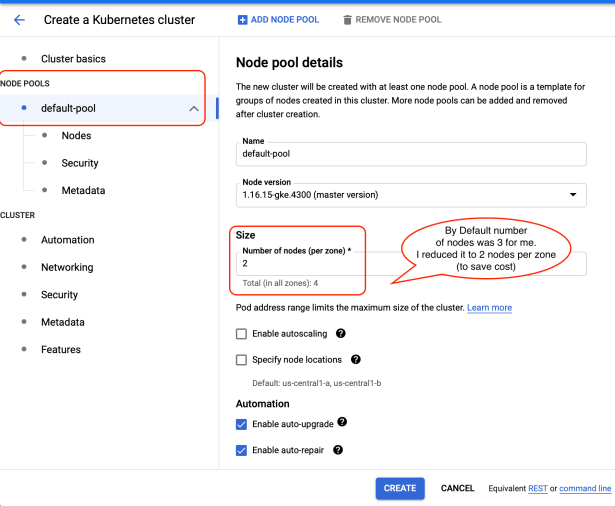
The first thing we would like to configure is number of nodes per zone.
Go to Left Menu -> Node Pools – default-pool, and select number of nodes per zone.
Choose these options wisely, since your cost will increase as number of nodes in cluster increases.
Total nodes in the cluster = number of zones * number of nodes per zone.
e.g if you have selected 3 zones in previous step, and 2 nodes per zone, then the cluster will be created with 6 nodes.
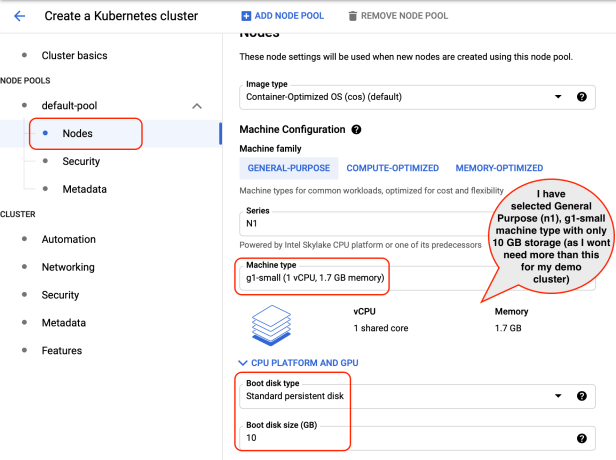
Now that we have configure the default node pool and number of nodes in each zone, lets configure the sizing for each node.
Go to Node Pools -> default-pool -> Nodes, and select options for
– Image type (choose an OS for node)
– Machine Family and Type – Choose correct type based on your computing requirements and budget. Since billing is done as per machine type, so this can have big impact on your cost.
– Persistent Disk – choose correct storage as per your requirement and budget.
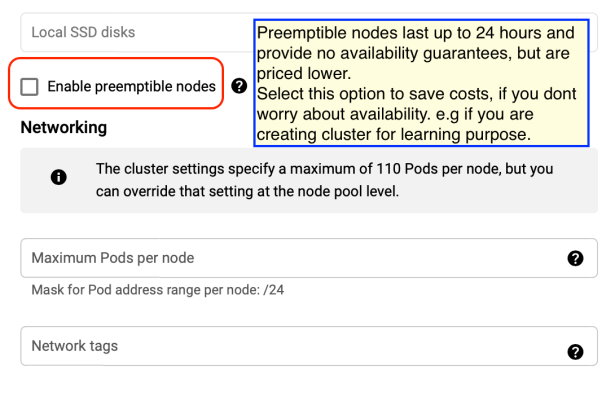
Decide whether you want Preemptible nodes. As mentioned before, it can bring down your costs by big margin. But since these nodes do not provide availability guarantee, so choose as per your requirement.
I definitely choose this option, as I was creating the cluster for learning purpose and needed to use the cluster only for 1-2 hrs a day at max.
Thats all the configuration we will need for now.
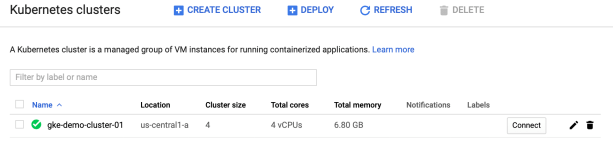
Go ahead and Create the cluster now.
Once creted it will show up on your Clusters Dashboard.
3.0 Connecting to cluster from local machine using kubectl
Now that we have created the cluster, we will now see how to connect to the cluster from local machine using kubectl
3.1 Install Pre-requisites on local machine
First thing first, we will need to install kubectl and gcloud command-line tool
- Install Kubectl
- You can refer to our last blog on how to install kubectl.
- Alternative you can also refer to the official documentation on how to install kubectl
- Install Google Cloud SDK
- Follow the steps on installation guide to install Google Cloud SDK.
To verify installed components for Google Cloud SDK, run the command
gcloud components list
3.2 Configuring gcloud on local
Now lets configure our gcloud command line tool to connect to the cluster we just created.
- Authenticate: First step, is to authenticate using your Google Cloud account. Run below command
glcoud auth login --no-launch-brower
- Add Project information, once you are logged in. Run command
gcloud config set project <project name>
- Next check if
compute/regionandcompute/zoneis set properly or not. Run command
gcloud config get-value compute/region
gcloud config get-value compute/zone
- Add Compute Region/Zone: Run below command to add
compute/regionandcompute/zone
gcloud compute project-info add-metadata\
   --metadata google-compute-default-region=<region>,google-compute-default-zone=<zone>
In case you dont know the available regions or zone, you can run below command to get the list of regions and zones
gcloud compute regions list
gcloud compute zones list- Verify Config: Once done, you can verify your config using below command
gcloud config list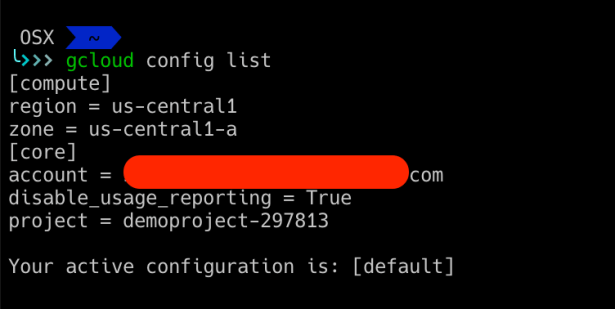
Thats all, and we are done configuring Google Cloud SDK
To view your cluster details, you can run command
gcloud container clusters list
To view all the compute instances / nodes, run command
gcloud compute instances list
3.3 Generate a kubeconfig on local machine
In our last blog, we saw how we used kubectl command to connect to our local cluster.
Kubectl needs a Kube Configuration in order to know details of Kubernetes cluster. The kubeconfig, generally contains information on how to access Kubernetes cluster and contains details about cluster, users, namespaces, authentication, etc.
For local clusters this information is already available when the clusters were created on our local machines.
You can view the current config using command
kubectl config view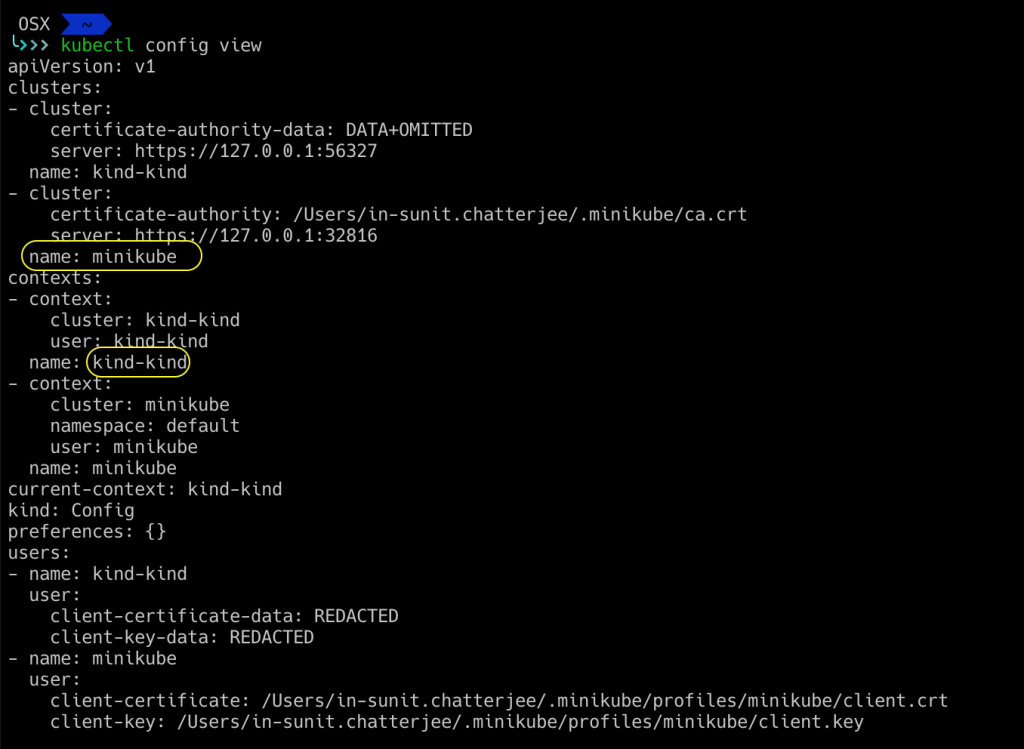
As you can see above, kubectl currently only knows about local clusters created (minikube and kind).
In order to the enable kubectl to connect to our Google Cloud Cluster, we will need to generate Kube Configuration for the same. The easiest way to do so is to do via gcloud command line tool, since we have already configured the gcloud command line tool to connect to the cluster.
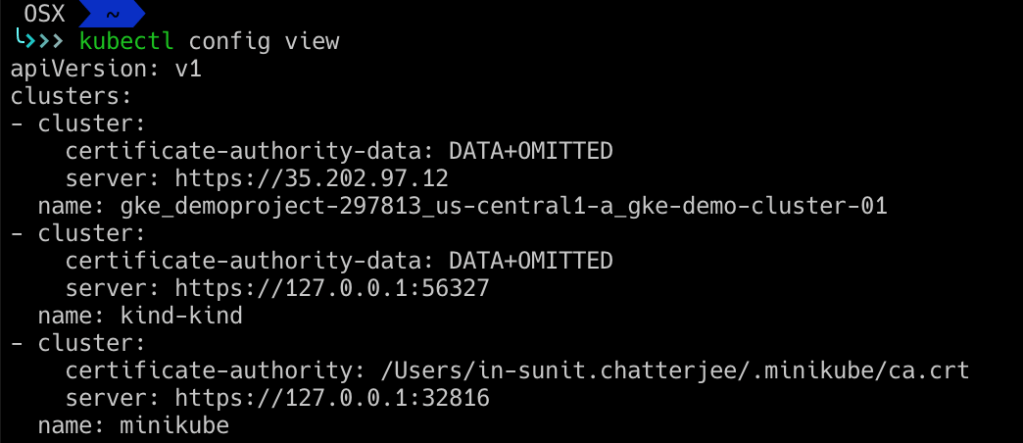
Run below command to get your cluster credentials, and generate a kube configuration
gcloud container clusters get-credentials <cluster-name>
Now if you get the configurations, you can see Google Cloud cluster information already present.
3.4 Connecting to the cluster
First check all kube contexts using command
kubectl config get-contexts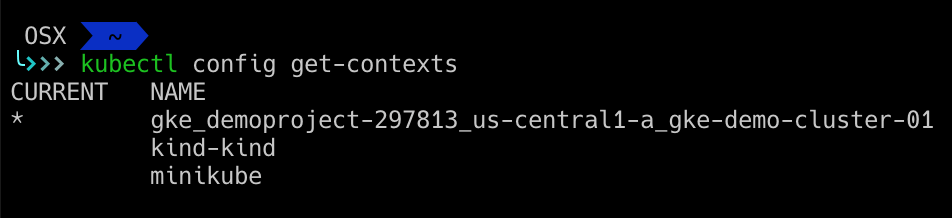
You can check current contexts using command
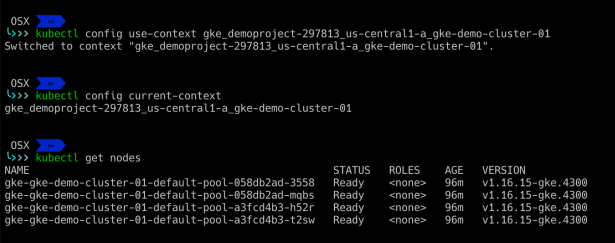
kubectl config use-context <context-name>
kubectl config current-context
Once you have set the correct context, you can run kubectl commands on the cluster
3.5 Stopping/Resizing cluster nodes
Since I have created the cluster only for learning purpose and I dont need it running forever, I would want to either stop the cluster nodes or resize them to less number of nodes (to save on cost)
We can do it using command
gcloud container clusters resize <cluster-name> --num-nodes=<size>If --num-nodes = 0, then all cluster nodes are removed.
If --num-nodes = n, then cluster is resized to “n” nodes per zone.

Thats all we have for now. In future blogs we will see how to deploy pods, services, etc on kubernetes cluster.
