
In this blog we will look into how to use Spring’s caching framework to add basic caching support to any Spring Boot application, and also look at some issues with caching if not implemented right. And last but not the least, we will look at few cache examples that are helpful in real world scenarios.
Table of Contents
- 1.0 Why add caching to your application
- 2.0 Implementing caching in Spring Boot application
- 2.1 What caching support does Spring Boot provides?
- 2.2 Adding build dependencies
- 2.3 Cache configurations
- 2.4 Caching a method result
- 2.5 Test if caching is working
- 3.0 Why caching can be dangerous sometimes
- 4.0 Cache Customizations
The entire code of for this project can be found at – https://github.com/chatterjeesunit/spring-boot-app/tree/v6.0
To checkout this Release tag, run following command
git clone https://github.com/chatterjeesunit/spring-boot-app.git
cd spring-boot-app
git checkout tags/v6.0 -b v6.0-with-caching
1.0 Why add caching to your application
Before we dive deeper into how to add caching to your application, the first question that comes to mind is why we need caching in our application.
Suppose there is an application with customer data, and an user makes two requests to fetch data of a customer (with id = 100).
This is how it will look like without caching.

As you can see, for each requests the application goes to database to fetch the data. Fetching data from database is a costly operations as it involes IO.
However if you have a Cache store in between where you can temporarily store data for short periods of time, then you can save these roundtrips to database and save on IO time.
This is how the above interactions might look like with caching in play.

2.0 Implementing caching in Spring Boot application
You can start with any Spring Boot application and add caching support to it.
However for all code references in this blog, we will start with the base application that we already build in our previous blog. You can find the starting base code at – https://github.com/chatterjeesunit/spring-boot-app/tree/v5.0
Also we have used Gradle as our build tool in current project.
2.1 What caching support does Spring Boot provides?
- Spring Boot ONLY provides a caching abstraction using which you can add caching transparently and easily to your Spring application.
- It DOES NOT provide an actual cache store.
- However it can work with different types of caching providers like
Ehcache,Hazelcast,Redis,Caffeine, etc. Please refer here for all supported cached providers. - Spring Boot’s caching abstraction can be added to methods (using annotations)
- Basically before a method is executed, Spring framework will check if the method data is already cached
- If yes, then it will fetch the data from the cache.
- Else it will execute the method and cache the data
- It also provides abstractions to update or remove data from the cache.
In our current blog we will look at how to add caching using Caffeine which is a high performance, near optimal caching library based on Java8.
You can specify which cache provider to use setting the
spring.cache.typeproperty in theapplication.yamlfile.
However if no property is provided Spring will auto-detect the cache provider based on added libraries.
2.2 Adding build dependencies
Now assuming that you have your basic Spring boot application up and running, lets go and add dependencies for caching.
Open build.gradle file, and add following dependency to enable Spring Boot’s caching
compile('org.springframework.boot:spring-boot-starter-cache')Next we will add dependency for Caffeine
compile group: 'com.github.ben-manes.caffeine', name: 'caffeine', version: '2.8.5'2.3 Cache configurations
Now we need to enable Caching in our Spring Boot application.
We do so be creating a Configuration class and providing the annotation @EnableCaching.
@Configuration
@EnableCaching
public class CacheConfig {

}
Right now this class is an empty class, but we can add more configurations to it (if required).
Now that we have enabled caching, lets provide configurations for cache-names and cache properties like cache size, cache expiry, etc
The simplest way to do it to add configurations in application.yaml
spring:
  cache:
    cache-names: customers, users, roles
    caffeine:
      spec: maximumSize=500, expireAfterAccess=60s
The above configuration does following
- Restricts the available
cache-namesto customers, users, roles. - Sets the
maximum cache-sizeto 500. Objects gets removed from cache based on cache eviction policy when the number of objects in cache reaches this limit. - Sets the
cache-expirytime to 1 minutes. This means that an item will be removed from the cache 1 minutes after it has been added to the cache.
Caffeine Cache Spec supports many properties like –
initialCapacity,maximumSize,maximumWeight,expireAfterAccess,expireAfterWrite,refreshAfterWrite.We are not going into details of each property in this blog.
There is also an alternate way to configure the cache, instead of configuring it in application.yaml file.
You can add provide a CacheManager Bean in your Cache Configuration class, that can do the exact same thing as by above configuration in application.yaml
@Bean
public CacheManager cacheManager() {
    Caffeine<Object, Object> caffeineCacheBuilder =
        Caffeine.newBuilder()
            .maximumSize(500)
            .expireAfterAccess(
                    1, TimeUnit.MINUTES);

    CaffeineCacheManager cacheManager =
            new CaffeineCacheManager(
            "customers", "roles", "users");
    cacheManager.setCaffeine(caffeineCacheBuilder);
    return cacheManager;
}
In our code example we will go with Java configuration.
We can do lot more in Java like configuring a RemovalListener, thats gets executed when an item is removed from cache, or enabling recording of cache statistics, etc.
2.4 Caching a method result
In the sample Spring boot application that we have used, we already have following API GET /api/v1/customer/{id} to retreive a customer record.

We will add Caching to the method getCustomerById(Long customerId) of class CustomerService.
To do this, we only need to do two things
- Add annotation
@CacheConfig(cacheNames = "customers"), to theCustomerServiceclass- Providing this will ensure that all cacheable methods of
CustomerServicewill use the cache name “customers“
- Providing this will ensure that all cacheable methods of
- Add annotation
@Cacheableto the method –Optional getCustomerById(Long customerId)
@Service
@Log4j2
@CacheConfig(cacheNames = "customers")
public class CustomerService {

    @Autowired
    private CustomerRepository customerRepository;

    @Cacheable
    public Optional<Customer> getCustomerById(Long customerId) {
        log.info("Fetching customer by id: {}", customerId);
        return customerRepository.findById(customerId);
    }
}
Additionally add a LOGGER statement to the method – getCustomerById(), so that we will know if the service method gets executed or if the value is being returned from the cache.
log.info("Fetching customer by id: {}", customerId);
2.5 Test if caching is working
This is all we need for caching to work. Now its time to test the caching.
Start your application, and hit the customer GET url
http://localhost:8080/api/v1/customer/<id>After the first API call you will see following line in the log – “Fetching customer by id“.
However if you hit the API again, you won’t see anything in logs. This means that the method is not getting executed and customer record is returned from the cache.
Now wait for a minute (since cache expiry time was set to 1 minute).
Hit the GET API again after a minute, and you will see the following statement getting logged again- “Fetching customer by id“.
This means that the customer record got removed from the cache after 1 minute, and had to be fetched from the database again.
3.0 Why caching can be dangerous sometimes
3.1 Cache Update/Cache Eviction
Generally we cache the GET calls, to improve performance.
But its the updation/deletion of cached object that we need to be very careful about.
- On every update, the latest version of object needs to be updated in the cache (using
@CachePut) - On every delete, the object needs to be removed from the cache (using
@CacheEvict)
In case if you miss putting @CachePut/@CacheEvict to your update/delete methods – the object returned by cache in GET call will be different from the one stored in the database. Consider the sample scenario below.

As you can see, the second request had updated the Person name to “John Smith”. But since it did not update the cache – hence all requests from here on will fetch the stale Person record (“John Doe”) from the cache, till the item is removed/updated in the cache.
3.2 Cache Replication
Most modern web applications generally have more than one application nodes, and there is a load balancer in most cases that redirects the user requests to one of the available application node.
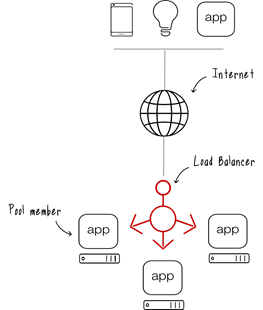
This type of deployment provides scalability to the application, and any user request can be served by any one of the available application node.
In these distributed environments (with multiple application server nodes), caches can be implemented in two ways
- Embedded cache within the application server (as we have seen till now)
- Remote cache server
3.2.1 Embedded Cache
Embedded cache resides within the application server and it starts/stops with the application server. Since each server has its own copy of cache, any change/update to its cache is not automatically reflected in the caches of other application server.
Consider the below scenario of multi node application servers with embedded caches, where users can get different results based on which application server serves their request

As you can see in above example, the update request updated the database and the embedded cache for Application Node 2.
However the embedded cache for Application Node1 was not updated, and it contained the stale data. So any request to Application Node1 continued to serve old data.
To solve this you need to implement CACHE REPLICATION – where any update in any one of the cache is replicated automatically to other caches (show as blue dotted line in the below diagram)

In this blog we will not cover cache replication and will cover it in a future blog
3.2.2 Remote Cache Server
One another way to solve above problem is to have a remote cache server (like shown below).
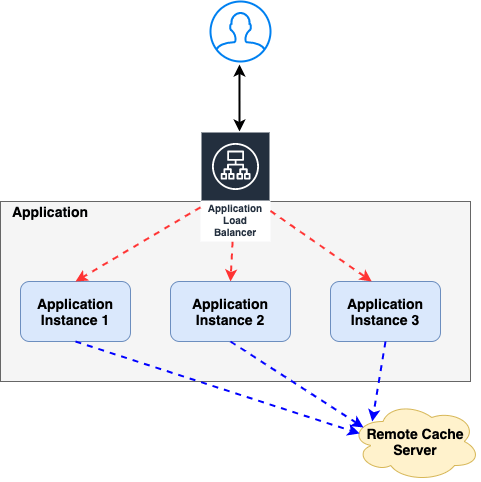
However the biggest drawback with this approach is that it increases the response time – due to network latency in fetching data from remote cache server (as compared to in-memory cache)
4.0 Cache Customizations
The cache example that we have seen so far, is the only code that we need to add basic caching to our application.
However the real world scenarios may not be so simple and may require some customizations to be done. In this section we will see at few such examples
4.1 Cache Keys
We know that cache is a store of Key, Value pair.
Out of the box, the caching abstraction uses a simple
KeyGeneratorbased on the following algorithm:
1. If no params are given, returnSimpleKey.EMPTY.
2. If only one param is given, return that instance.
3. If more the one param is given, return aSimpleKeycontaining all parameters.
Example 1 : Default Cache Key – method with single argument
Simplest cache key is when method has one argument only, and that argument becomes the Cache Key. In below example Long customerId is the cache Key

Example 2 : Default Cache Key – method with multiple arguments
In below example the Cache Key is a SimpleKey of all three params – countryId, regionId, personId.

This approach works well for most use-cases – as long as parameters have natural keys and implement valid
hashCode()andequals()methods.
Example 3 : Custom Cache Key
In below example we specify the person’s emailAddress as the key for the cache

@Cacheableannotation allows the user to specify how the key is generated through itskeyattribute. The developer can use SpEL to pick the arguments of interest (or their nested properties.
Example 4 : Custom Cache Key using KeyGenerator
Lets look at the example below – what if want to cache all roles for the current logged in user.

There is no arguments provided in the method, and method internally fetches the current logged in user and return their roles.
To implement this requirement, we need to create a custom KeyGenerator like this below

And then we can use this KeyGenerator in our method as shown below.

4.2 Conditional caching
There are some use cases where we want to cache the result only if certain conditions are met
Example 1 (Support for java.util.Optional – cache only if present)
Cache the person object, only when Person object is present in result.
@Cacheable( value = "persons", unless = "#result?.id")
public Optional<Person> getPerson(Long personId)
Example 2 (by-pass cache if required)
@Cacheable(value = "persons", condition="#fetchFromCache")
public Optional<Person> getPerson(long personId, boolean fetchFromCache)
Get a person from cache only if method parameter “fetchFromCache” is true. In this way caller of method can sometime decide to by-pass the cache and get the value directly from database.
Example 3 (conditional cacing based on object attributes)
Cache a Product only if the price is less than 500 and product is in stock.
@Cacheable(
   value="products",
   condition="#product.price<500",
   unless="#result.outOfStock")
public Product findProduct(Product product)
4.3 @CachePut
We have seen that @Cacheable is used to put an item into Cache.
But what if that object is updated and we want to update the cache?
We have already seen in a previous section, where not updating a cache post any update operation can lead to wrong results being returned from cache.
@CachePut(key = "#person.id")
public Person update(Person person)
But then if both @Cacheable and @CachePut puts an item in the cache, what is the difference between them?
The major difference is in the actual method execution
@Cacheable– Method code is NOT executed if item found in cache.@CachePut– Method code is always executed and cache is updated after method execution.
4.4 Cache Eviction
Cache eviction is as important as putting objects in cache.
There are lot of scenarios when we want to remove one or more objects from cache. Lets look at some examples.
Example 1
Suppose we have an API that is used for importing person records in bulk.
And we want that before invocation of this method, entire person cache should be cleared (since most of the person records might be updated on import, and cache might get stale). We can do so as below
@CacheEvict(
   value = "persons",
   allEntries = true,
   beforeInvocation = true)
public void importPersons()
Example 2
We have an Delete Person API, and we want that it should remove the person record from cache too on deletion.
@CacheEvict(
   value = "persons",
   key = "#person.emailAddress")
public void deletePerson(Person person)
By default @CacheEvict, runs after method invocation.
With this we come to end of this blog. In future blogs we will look into cache replication using Hazelcast.
The entire code of for this project can be found at – https://github.com/chatterjeesunit/spring-boot-app/tree/v6.0
To checkout this Release tag, run following command
git clone https://github.com/chatterjeesunit/spring-boot-app.git
cd spring-boot-app
git checkout tags/v6.0 -b v6.0-with-caching

Nice blog, covers important concepts succinctly. Thank you !!!
LikeLike
Thanks for the beautiful blog. Appreciate your efforts. Could you please share a blog on distributed cache with memcached/reddis. And which one to choose under what use cases.
LikeLike
I haven’t yet tried distributed cache with memchached/redis. However I have done distributed cache with Hazelcast – https://sunitc.dev/2020/09/12/spring-boot-distributed-caching-using-hazelcast/
LikeLike