
In this blog we will look at how to do authentication using JWT (Json Web Token)
Table of Contents
The entire code of for this project can be found at https://github.com/chatterjeesunit/spring-boot-app/tree/v5.0
To checkout this Release tag, run following command
git clone https://github.com/chatterjeesunit/spring-boot-app.git
cd spring-boot-app
git checkout tags/v5.0 -b v5.0-with-jwt-auth
1.0 Introduction
In our previous blog, we looked at how to add basic authentication and authorization to a Spring Boot application and do authentication using username and passwords.
However it had one very big disadvantage – It required user to pass an username and password in EVERY request.
What we want is that the user authenticates themselves onces, and get a token that authenticates their identity. And from next request onwards they can just send this token to the server and get authenticated access.

This blog assumes that you already have some kind of authentication/authorization in your application (possibly username/password based), and this blog will help you move to JWT based authentication.
We will use the following Spring boot app as the base source code for our application – https://github.com/chatterjeesunit/spring-boot-app/tree/v4.0
However if you are adding authentication/authorization from scratch in your application, then please go through the previous blog first – Spring Boot : Adding Basic Authentication / Authorization to your application
2.0 JWT generation and parsing
In this section we will provide basic steps to create a JWT and parse it.
We will also show how to add some basic claims to JWT.
If you are new to JWT, claims, secrets, etc then please go through this blog to understand more about JWT and how it works – Working with JWT (Json Web Tokens)
2.1 Configurations/Dependencies
Add the following gradle dependencies to import the JJWT library
compile 'io.jsonwebtoken:jjwt-api:0.11.2'
runtime 'io.jsonwebtoken:jjwt-impl:0.11.2'
runtime 'io.jsonwebtoken:jjwt-jackson:0.11.2'
Next add following configurations in application.yaml
auth:
  jwt:
    issuer: "Spring Boot App"
    audience: "Demo App"
    ttl-in-seconds: 3600
    secret: "ej7+D6Hh2r2KBEIuoGz1RGjtXooObzebSSxNm7yu2YSkEKv8aQmC2iYuxXLkKYKgT1210e5ZKMoY4XM0uQnkJkKGA01tBWZK+Pi3zX+nZvVNTJbZwRSOyZ2bm99exCq+z6ER5q5XWes1G9/sG5rp7kK9bL/NdNdU13HAFjJew6NwyxIxFH5VhXWwtgIJy+1KcJ9+3kq6uYNylrPC2U1h0xvR9qQzi1D2m9H8ZA=="
We have provided following configurations
auth.jwt.issuer– Used to set Issuer claim in JWT.auth.jwt.audience– Used to set Audience claim in JWT.auth.jwt.ttl-in-seconds– Expiry for JWT in seconds.auth.jwt.secret– 512 byte secret to be used in conjunction withHS512signing algorithm.
You can generate a random secret using following command
openssl rand -base64 172 | tr -d '\n'2.2 Read configurations and generate Secret Key
Now that we have added a gradle dependencies and also added configurations, lets create a class – com.dev.springdemo.auth.jwt.JWTUtil, that will be used to create a JWT token – and read all the configurations from the application.yaml file using @Value annotation.
@Component
@Log4j2
public class JWTUtil {
    @Value("${auth.jwt.issuer}")
    private String issuer;

    @Value("${auth.jwt.secret}")
    private String secret;

    @Value("${auth.jwt.audience}")
    private String audience;

    @Value("${auth.jwt.ttl-in-seconds}")
    private long timeToLiveInSeconds;
}
Next add code to generate a SecretKey.
We will use @PostConstruct annotation to generate secret key after all dependencies are injected into this class.
Add following code to class – com.dev.springdemo.auth.jwt.JWTUtil
private SecretKey secretKey;

@PostConstruct
public void setUpSecretKey() {
    try {
        secretKey = Keys.hmacShaKeyFor(secret.getBytes("UTF-8"));
    } catch (UnsupportedEncodingException e) {
        log.error("Error generating JWT Secret Key : {}", e.getMessage());
        throw new RuntimeException("Error generating JWT Secret Key", e);
    }
}
2.3 Create a JWT
Now that we have read all configurations and created a secret key, we will now add code to generate a JWT token with following claims
- Expiry – set to 1 hr (configurable in
application.yaml) - Subject – set to user’s username (email address).
- FirstName
- LastName
Add following method createJWT to create a JWT for the given user.
private static final String CLAIM_FIRST_NAME_KEY = "FirstName";
private static final String CLAIM_LAST_NAME_KEY = "LastName";


public String createJWT(User user) {

    String jwt =
        Jwts.builder()
            .setId(UUID.randomUUID().toString())
            .setSubject(user.getUsername())
            .setIssuer(issuer)
            .setIssuedAt(Date.from(Instant.now()))
            .setExpiration(Date.from(Instant.now().plus(
                  Duration.ofSeconds(timeToLiveInSeconds))))
            .claim(CLAIM_FIRST_NAME_KEY, user.getFirstName())
            .claim(CLAIM_LAST_NAME_KEY, user.getLastName())
            .signWith(secretKey)
            .compact();
    return jwt;
}
2.4 Parsing a JWT
Next we will add code to parse a JWT and extract claims from it.
public Claims parseJWT(String jwtString) {

    Jws<Claims> headerClaimsJwt =
        Jwts.parserBuilder()
            .setSigningKey(secretKey)
            .build()
            .parseClaimsJws(jwtString);

    Claims claims = headerClaimsJwt.getBody();

    return claims;
}
The same SecretKey that is used for creating JWT should be using for parsing JWT too, other wise you will get a SigningException.
You can look up entire code at github – JWTUtil.java
3.0 Add a Rest API to get JWT token
In this section we will add code to do following – create a REST API /api/v1/auth/token that will take an username/password and return a JWT token.
3.1 Modify Security Config
In our previous blog, we already created a SecurityConfig class that was used to configure authentication. If you are building from scratch, we recommend copying the initial code of SecurityConfig class, and Auth package to add the basic authentication first.
First add a method to create a Bean for org.springframework.security.authentication.AuthenticationManager
@Bean
public AuthenticationManager getAuthenticationManager() throws Exception {
    return authenticationManager();
}
Next add configuration in the method – void configure(HttpSecurity http), to
- Skip authentication for –
/api/v1/auth/token. This means anybody can request a token by providing a username and password. - Change Spring Session management to
STATELESS, to avoid any sessions being maintained.
@Override
protected void configure(HttpSecurity http) throws Exception {
    http
        .formLogin().disable()
        .csrf().disable()
        .httpBasic()
        .and()
        .sessionManagement()
            .sessionCreationPolicy(SessionCreationPolicy.STATELESS)
        .and()
        .authorizeRequests()
        .antMatchers("/actuator/**").permitAll()
        .antMatchers("/api/v1/auth/token").permitAll()
        .antMatchers(HttpMethod.POST).hasRole("ADMIN")
        .antMatchers(HttpMethod.PUT).hasRole("ADMIN")
        .anyRequest().authenticated();
}
3.2 Create API – /api/v1/auth/token
First create a class LoginRequest, for capturing username and password.
@NoArgsConstructor
@Getter
@Setter
public class LoginRequest {

    @NotNull
    private String userName;

    @NotNull
    private String password;
}
Next we will create an REST API /api/v1/auth/token that will take an username/password and return a JWT token.
- Takes a
LoginRequestwith username and password - Creates an instance of
UsernamePasswordAuthenticationToken. - Calls method
AuthenticationManager.authenticate(..)– using theUsernamePasswordAuthenticationTokencreated above. - Gets the current user from
Authentication principal. - Creates a
JWTtoken - Returns the JWT token in response
Authorizationheader with http status 200.
@RestController
@RequestMapping("/api/v1/auth/")
public class AuthController {

    @Autowired
    private AuthenticationManager authenticationManager;

    @Autowired
    private JWTUtil jwtUtil;

    @PostMapping(path = "/token",
            consumes = MediaType.APPLICATION_JSON_VALUE,
            produces = MediaType.APPLICATION_JSON_VALUE)
    public ResponseEntity<?> getToken(@Valid @RequestBody LoginRequest loginRequest) {

        UsernamePasswordAuthenticationToken loginCredentials =
                new UsernamePasswordAuthenticationToken(
                        loginRequest.getUserName(), loginRequest.getPassword());

        Authentication authentication =
                authenticationManager.authenticate(loginCredentials);

        User user = (User) authentication.getPrincipal();
        String jwtToken = jwtUtil.createJWT(user);

        return ResponseEntity
                .ok()
                .header(HttpHeaders.AUTHORIZATION, "Bearer " + jwtToken)
                .build();

    }
}
3.3 Testing token generation
Lets run our application and generate a JWT token
Run application using command – ./gradlew clean bootRun
Next hit the token generation API.
We are hitting the API using curl command. You can also use Postman tool for the same.
curl -i -X POST \
    -H "Content-Type: application/json" \
    'localhost:8080/api/v1/auth/token' \
    -d '{
    	"userName":"admin01@tw.com",
    	"password":"admin01@123#"
    }'
You will see a HTTP 200 response with Authorization header containing the JWT Token.
HTTP/1.1 200
Authorization: Bearer eyJhbGciOiJIUzUxMiJ9.eyJqdGkiOiIwMzljYjVjNC0zNGE0LTQwYjAtYTBiMC02ZWU3MTQyNDI4ZmYiLCJzdWIiOiJhZG1pbjAxQHR3LmNvbSIsImlzcyI6IlNwcmluZyBCb290IEFwcCIsImlhdCI6MTU5ODEyNjA4NywiZXhwIjoxNTk4MTI5Njg3LCJGaXJzdE5hbWUiOiJTdXBlciIsIkxhc3ROYW1lIjoiQWRtaW4gMDEifQ.Ex9i3eDIFKBpE7KNwlfY6F3Ng2j9-mlQ7jHhNaObOxeC3MtedGKEDmQ0BWxNMZJAYsnbcNLniYBu4Gty4GpI8A4.0 Authenticate on JWT
Now that we have succesfully exposed an API to generate JWT token, lets modify our authentication to validate the JWT and authenticate using it.
4.1 Create an Auth JWT Filter
First we will need to create a JWT Filter, that will do following
- Read
JWTfrom theAuthorizationheader. - Parse the
JWTto get theusername. - Using the username, fetch user details from the
UserService. - Create
UsernamePasswordAuthenticationToken, by providing user and roles details. - Update
SecurityContext.
@Log4j2
public class AuthTokenFilter extends OncePerRequestFilter {

    public static final String _BEARER = "Bearer ";

    @Autowired
    private UserService userService;

    @Autowired
    private JWTUtil jwtUtil;

    @Override
    protected void doFilterInternal(HttpServletRequest request, HttpServletResponse response,
                                    FilterChain filterChain) throws ServletException, IOException {

        try {
            String headerAuth = request.getHeader(HttpHeaders.AUTHORIZATION);


            if (StringUtils.hasText(headerAuth) && headerAuth.startsWith(_BEARER)) {
                String jwtToken = headerAuth.substring(7);

                String username = jwtUtil.parseJWT(jwtToken).getSubject();

                UserDetails userDetails = userService.loadUserByUsername(username);
                UsernamePasswordAuthenticationToken authentication =
                        new UsernamePasswordAuthenticationToken(
                            userDetails, null, userDetails.getAuthorities());
                authentication.setDetails(new WebAuthenticationDetailsSource().buildDetails(request));

                SecurityContextHolder.getContext().setAuthentication(authentication);
            }

        } catch (Exception ex) {
            log.error("Error authenticating user request : {}", ex.getMessage());
        }

        filterChain.doFilter(request, response);
    }
}
4.2 Update SecurityConfig
Update the SecurityConfig class
Create a Bean of AuthTokenFilter class created above.
@Bean
public AuthTokenFilter getJWTAuthTokenFilter() throws Exception {
    return new AuthTokenFilter();
}
Configure the JWT AuthTokenFilter to execute before the UsernamePasswordAuthenticationFilter, in the method – void configure(HttpSecurity http)
addFilterBefore(getJWTAuthTokenFilter(), UsernamePasswordAuthenticationFilter.class)5.0 Testing end to end
Now lets test our application’s authentication end to end.
First we will test using CURL command.
Generate a JWT
curl -i -X POST \
    -H "Content-Type: application/json" \
    'localhost:8080/api/v1/auth/token' \
    -d '{
    	"userName":"admin01@tw.com",
    	"password":"admin01@123#"
    }'
You will get response like this below.
HTTP/1.1 200
Authorization: Bearer eyJhbGciOiJIUzUxMiJ9.eyJqdGkiOiIxYTIwOGZjZS1hNzZhLTQzNTMtYjM5MC1iM2I4MjE2NTAyZTMiLCJzdWIiOiJhZG1pbjAxQHR3LmNvbSIsImlzcyI6IlNwcmluZyBCb290IEFwcCIsImlhdCI6MTU5ODEyNzE4OSwiZXhwIjoxNTk4MTMwNzg5LCJGaXJzdE5hbWUiOiJTdXBlciIsIkxhc3ROYW1lIjoiQWRtaW4gMDEifQ.9bzjESHi6ZAJeBzCLobfNBKUjgKxVVJ-nu6cfz7baz56TuTI8JvXAZuzhZ3KuAeYM9v-HHqafMXcbXsBDHGa-A
Now hit the Customer Search API using the JWT token
curl -i 'localhost:8080/customer/?pageNum=0&pageSize=5' \
-H "Accept: application/json" \
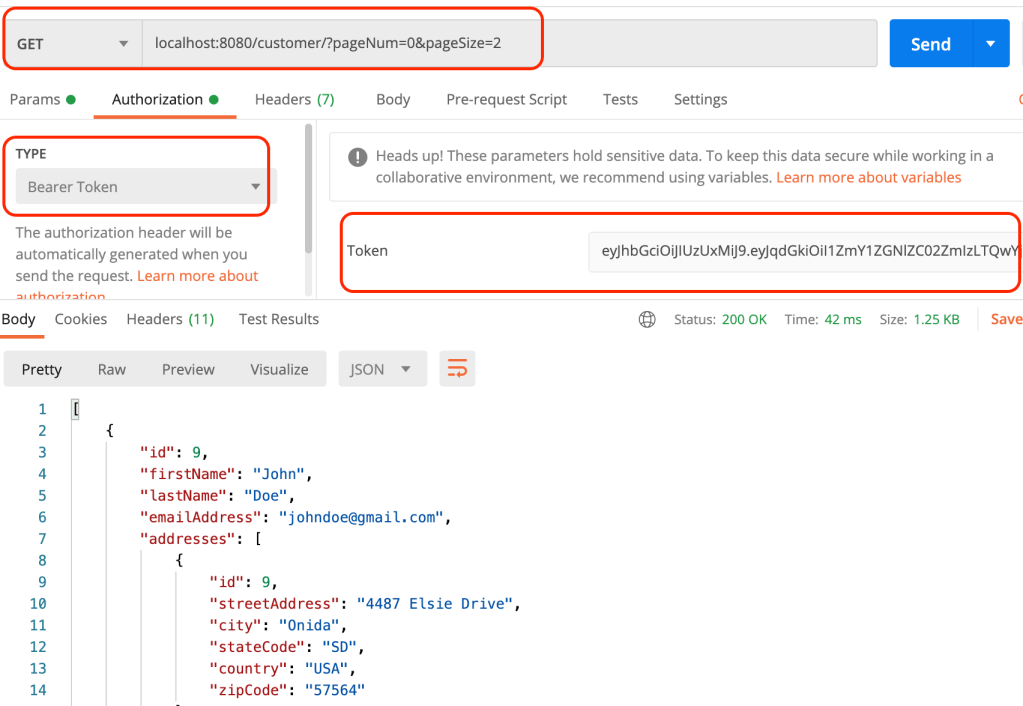
-H "Authorization: Bearer eyJhbGciOiJIUzUxMiJ9.eyJqdGkiOiIxYTIwOGZjZS1hNzZhLTQzNTMtYjM5MC1iM2I4MjE2NTAyZTMiLCJzdWIiOiJhZG1pbjAxQHR3LmNvbSIsImlzcyI6IlNwcmluZyBCb290IEFwcCIsImlhdCI6MTU5ODEyNzE4OSwiZXhwIjoxNTk4MTMwNzg5LCJGaXJzdE5hbWUiOiJTdXBlciIsIkxhc3ROYW1lIjoiQWRtaW4gMDEifQ.9bzjESHi6ZAJeBzCLobfNBKUjgKxVVJ-nu6cfz7baz56TuTI8JvXAZuzhZ3KuAeYM9v-HHqafMXcbXsBDHGa-A"Now lets do the same using postman

This will bring us to the end of this blog.
The entire code of for this project can be found at https://github.com/chatterjeesunit/spring-boot-app/tree/v5.0To checkout this Release tag, run following command
git clone https://github.com/chatterjeesunit/spring-boot-app.git
cd spring-boot-app
git checkout tags/v5.0 -b v5.0-with-jwt-auth
