

In this article we will look into how to create a Docker image of your Spring Boot application.
Table of Contents
1.0 Introduction : Why use Docker?
Docker enables us to package our application with all its dependencies and create a light weight, portable, self sufficient container which can be run anywhere.
It embodies the principle of “Build Once, Run Anywhere”.
Once we build the docker image of our application, we can run it on any host that has Docker runtime installed – developer environment, QA, UAT, or Production, etc.
2.0 Running docker container for our Spring Boot app
2.1 Creating the Dockerfile
For our article we will use a Spring boot application we already created in our previous blogs. You can find the code for it at Github.
Or you can use any Spring boot application of your choice.
We first need to create a Dockerfile – that contains all the instructions to build the layers of the docker image.
Our Spring Boot application needs only two things to run – Java & fat Jar file of our application with all dependencies (apart from third party dependencies like database server, etc)
2.1.1 Pre-requisite – Build the Jar file
First build the JAR file for your application. e.g if you are using Gradle, you can run below command.
./gradlew clean build
This command will create the fat JAR file of your application (with all dependencies), at /build/libs/ folder

2.1.2 Dockerfile
Traditionally, the docker file is called
Dockerfileand located in the root of the context.However we can technically create Docker file with any name and at any location.
In our example, we will name it as
Dockerfile.appto denote that its an Dockerfile for our application (as we might be creating more docker files for other components later)
Create a empty file with name Dockerfile.app in your application, and add following lines of code to it.
FROM adoptopenjdk/openjdk11:jre-11.0.8_10-alpine
LABEL maintainer="Sunit Chatterjee (developerpod.com)"
RUN adduser --no-create-home --disabled-password springuser
USER springuser:springuser
COPY build/libs/spring-boot-app-*.jar app.jar
ENTRYPOINT ["java","-jar","/app.jar"]
The above file contains following statement
FROM: It specified the base image or the starting image for our docker. We have choosenadoptopenjdk/openjdk11:jre-11.0.8_10-alpine, as the base image and it will provide the Java Runtime for our docker container.LABEL: ALABELcan be used to add any metadata to our docker image. In our example we added a label to identify who maintains this image. (This is completely optional)RUN: With theRUNcommand, we’re executing a shell command-line within the target system.- In the above command we are creating a new user
spring, and a new user groupspringuser. - We created this user, as we dont want to run our docker container with
rootuser privileges)
- The
RUNinstruction will execute any commands in a new layer on top of the current image and commit the results. - The resulting committed image will be used for the next step in the
Dockerfile.
- In the above command we are creating a new user
USER: The USER instruction sets the user name (or UID) and optionally the user group (or GID) to use when running the image and for anyRUN,CMDandENTRYPOINTinstructions that follow it in theDockerfile.
In our code, we have instructed the docker to run all commands asspringuser that we created in previous step (and not as root user)COPY: The last command tells Docker to COPY a few files from the local file-system into the image in a given path. In our code example we are copying the Spring Boot Jar that we built previously, into our docker image. This will make our docker image self-sufficient to run anywhere.ENTRYPOINT: AnENTRYPOINTallows you to configure a container that will run as an executable. In our example, it will make our docker execute the commandjava -jar /app.jarwhen it is run, to start our Spring Boot application
Please refer to the Dockerfile documentation, to know more about these commands.
2.2 Build the docker image
Now that we have created our Dockerfile, the next thing for us to create the docker image. We can do so by running following command
docker build -f <path-to-docker-file> -t <docker-image-tag> .
E.g for our application we ran following command to create a docker image with tag – chatterjeesunit/spring-boot-app:1.0
docker build -f docker/Dockerfile.app -t chatterjeesunit/spring-boot-app:1.0 .
You can verify the image is created, by running the docker images command. As you can see below an image of 195MB in size has been created.

As of now we are not pushing this docker hub to any docker repository. We are keeping it only on local system.
2.3 Running the docker container
To run the Spring Boot docker container we need to do following
- Create a docker network.
- This will be required for connecting the Spring Boot container with MySQL docker container.
- Below command will create a docker network with name as
"spring-boot-app-network"
docker network create spring-boot-app-network- Start Database container
- We will run a Mysql8 container in the same network that we created above.
rm -rf ~/data/mysql8
mkdir -p ~/data/mysql8

docker run \
  --name mysql-8.x \
  --network spring-boot-app-network \
  -e MYSQL_ROOT_PASSWORD=r00t \
  -e MYSQL_ROOT_HOST=% \
  -e MYSQL_DATABASE=testdb \
  -e MYSQL_USER=testdbuser \
  -e MYSQL_PASSWORD=dummyPass! \
  -v ~/data/mysql8:/var/lib/mysql \
  -p 3306:3306 \
-d mysql:8.0.21- Start Spring Boot Container
- Start it in same network created above.
- Expose port
8080 - Provide database / flyway db configurations for Spring Boot app, using environment variables.
- For host name of mysql server, provide the name of mysql container we created above (
mysql-8.x). Since they are in same network, the docker container will be able to resolve the host name.
docker run \
  --name spring-boot-app \
  --network spring-boot-app-network \
  -p 8080:8080 \
  -e SPRING_DATASOURCE_URL="jdbc:mysql://mysql-8.x:3306/testdb" \
  -e SPRING_DATASOURCE_USERNAME=testdbuser \
  -e SPRING_DATASOURCE_PASSWORD=dummyPass! \
  -e SPRING_FLYWAY_URL="jdbc:mysql://mysql-8.x:3306/testdb" \
  -e SPRING_FLYWAY_USER=testdbuser \
  -e SPRING_FLYWAY_PASSWORD=dummyPass! \
  -d chatterjeesunit/spring-boot-app:1.0
I already have DockStation installed on my machine, and I can verify on it that both containers running.

3.0 Optimizing the docker image
3.1 Why fat jar is not a good idea
When we create a Docker image from a Dockerfile, the docker image is build in layers. Each command of Dockerfile – RUN, COPY, ADD create a new layer on top of existing layers. You can view layers of your image using docker history command.
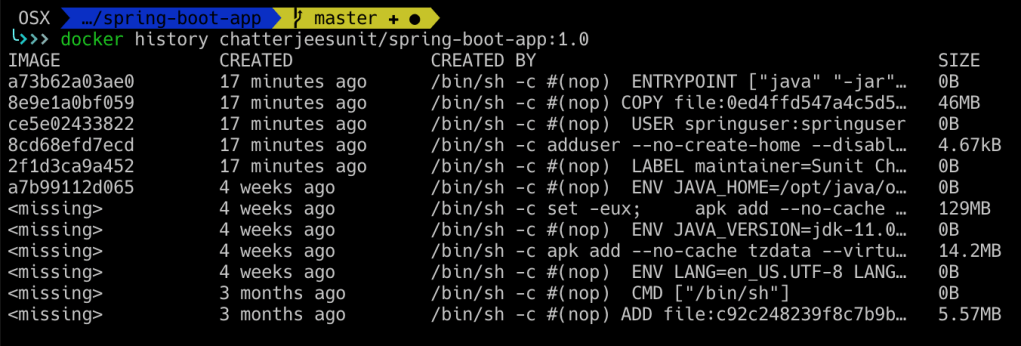
Suppose you make changes to your application, and need to rebuild the docker image. So you will COPY the entire big jar file back again into the docker image, and rebuild it. Lets rebuild the image and check history of image again
docker build -f docker/Dockerfile.app -t chatterjeesunit/spring-boot-app:1.0 .You can now see history like this below
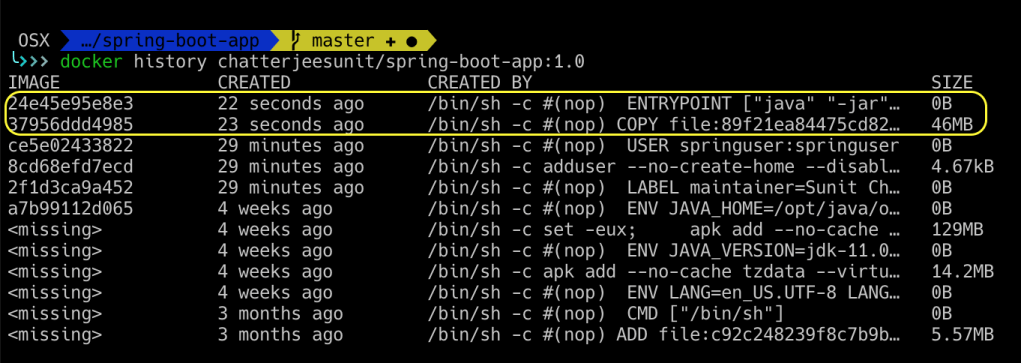
If you notice carefully, you will see that only the first two layers have been re-created again (from the COPY jar step onwards), and previous layers have been re-used.
So from this we can conclude that copying the full fat jar is not very efficient way to build a docker image, because
- For instance, the fat jar of our Spring Boot application was around 46 MB big, but the application code size is only 75 KB.
- Most of time its the application code that is changed, but we copy the entire 46 MB of fat jar to the docker image.
Another reason could be the overhead in running a fat jar vs running in exploded form.
3.2 Exploding fat jar
Lets now look at techniques to explode the fat jar when you package you Spring Boot application to docker.
The key here is to identify different components of a Spring Boot fat jar, and then package the slow changing components first (like the dependencies), and package the fast changing components at the last (like the application code).
A typical fat jar looks like this
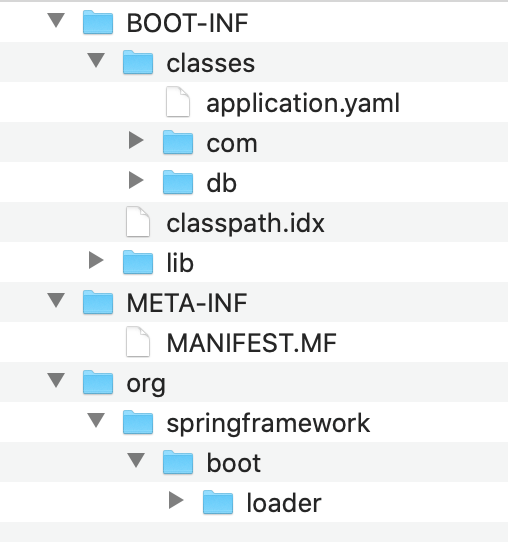
BOOT-INF/classes– application codeBOOT-INF/lib– dependency jarsMETA-INForg/springframework/boot– SpringBoot loader
Run the below command to explode the fat jar first
mkdir -p build/dependency
cd build/dependency
jar -xvf ../libs/spring-boot-app*.jar
If you want to avoid running custom scripts like above after build, you can add it as a Gradle task to you “build.gradle” file as shown below
task buildJar(type: Exec) {
   dependsOn(build)
   executable "sh"
   args "-c", "mkdir -p build/dependency && cd build/dependency && jar -xvf ../libs/spring-boot-app*.jar"
}
Now you can just run ./gradlew clean buildJar, and it will do all the needful for you.
Now we will create a new Dockerfile – Dockerfile.app-exploded, and add the components of fat jar in the order of how frequent they are changed.
FROM adoptopenjdk/openjdk11:jre-11.0.8_10-alpine
LABEL maintainer="Sunit Chatterjee (developerpod.com)"
RUN adduser --no-create-home --disabled-password springuser
USER springuser:springuser

ARG DEPENDENCY=build/dependency
COPY ${DEPENDENCY}/BOOT-INF/lib /app/lib
COPY ${DEPENDENCY}/META-INF /app/META-INF
COPY ${DEPENDENCY}/BOOT-INF/classes /app
ENTRYPOINT ["java", "-cp", "app:app/lib/*", "com.dev.springdemo.SpingDemoApplication"]
Note that we have specified the applications own main class file – com.dev.springdemo.SpringDemoApplication, as this is faster than using the indirection provided by the fat jar launcher.
Lets build the docker file now
docker build -f docker/Dockerfile.app-exploded -t chatterjeesunit/spring-boot-app:2.0 .You can run this docker image and verify that it works same as before (as with fat jar)
3.3 Using buildpacks with Spring Boot 2.3.3
Spring Boot 2.3.0.M1 added two new features to help build docker images (for both Maven and Gradle)
- buildpack support
- layered jars
The main benefit is that we dont have to explode fat jar ourselves, and build Dockerfile to manually copy components to the docker image.
Now with just one Gradle/Maven command we can build the layered image directly.
The main motivation behind buildpacks is to create the same deployment experience that some well-known cloud services such as Heroku or Cloud Foundry are providing for a while.
We just run the build-image goal and the platform itself takes care of building and deploying the artifact.
This is how we can now build the layered docker image with one command in Gradle.
./gradlew bootBuildImage --imageName=chatterjeesunit/spring-boot-app:3.0
The image is slightly bigger in size – 283 MB as compared to 195 MB earlier.
The other catch here is that the Created time of the images will show up as “40 years ago”. You can read more about it – https://buildpacks.io/docs/reference/reproducibility/
With this we come to end of this blog.
In futuer blog we will look at how to add use Docker Compose.
You can find the application/Dockerfile code on Github.
