

In this article we will look at how to use Docker compose to run multi-container applications. We will use Docker compose to start an application comprising of Spring Boot application / MySQL database and Traefik load balancer.
1. Why Docker Compose?
In our last post, we saw how to create a Dockerfile for your Spring Boot application and run the application using Docker container. But it only helped in running a single docker container only.
Any web application is generally composed of many components – application servers / database servers / load balancer, etc, all of which may be running in their own docker containers.
Running such an multi-container application requires lot of manual effort
- Creating networks and running all containers in same docker network.
- Running each container manually.
- Scaling up or down also requires us to manually start or stop each containers.
The problem becomes even bigger when we have to re-create the same application on other environments.
This is where Docker Compose comes to the rescue. It basically allows you to create a YAML file, in which we describe how we want to compose our application.
This YAML file is the source of truth of how we want to run our application, and can be used to deploy and run our entire application on any machine using simple commands.
2. Creating Docker Compose yaml file
Before we start creating the Docker compose yaml file, lets look at all the components of our sample application.
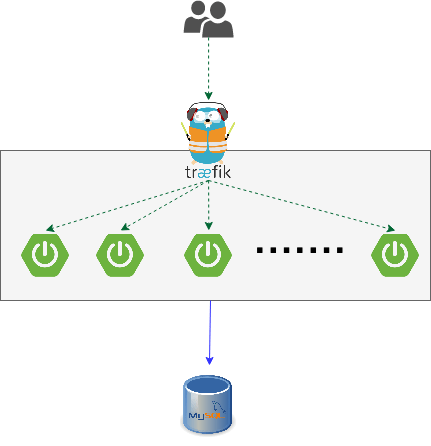
It consists of
- A load balancer (Traefik)
- 1 to N Spring Boot Application
- MySQL database
We will write a docker compose to start above application, and also see how we can scale it.
Lets start by creating an empty file – docker-compose.yml, and place it at the root folder of your Spring Boot application.
Add just one line to it – to denote the version of Docker Compose we will be using
version: '3.8'2.1 Creating networks
All the containers need to be on the same docker network.
This is to ensure that they can communicate with each other.
We will create two types of network for our application
- Internal Network
- Will not be accessible from outside
- All containers will be on the internal network.
- External Network
- Only those containers that need to be accessed directly from outside will be put on this network.
- Ideally only Traefik load balancer and the Mysql database will be on this network.
Add following lines to docker-compose.yml, to create both internal and external networks
networks:
  internal-nw:
    internal: true
  outside-nw:
2.2 Composing MySQL database
Different components of the application like database, application server, load balancer, etc are known as services in docker compose, and we will first create the database service.
Add following code to the docker-compose.yml
services:
  database:  # Name of the service.
    image: 'mysql:8.0.21'  # Mysql Image Tag
    environment:  # Specify environment variables
      MYSQL_ROOT_PASSWORD: r00t
      MYSQL_ROOT_HOST: '%'
      MYSQL_DATABASE: testdb
      MYSQL_USER: testdbuser
      MYSQL_PASSWORD: dummyPass!
    ports:  # Expose port 3306 to outside
      - '3306:3306'
    networks: # Specify the networks for this service
      - outside-nw
      - internal-nw
We did following in the above code
- Specified the service name as “
database“. - Provided the
imagetag, to specify that the Mysql container should be created from this docker image. - Provided the startup parameters via
environmentvariables. - Exposed Port 3306 to the host machine. The host can now connect directly to Mysql database port 3306.
- Specified that this service is available on both internal and external networks. The network names should be same as the networks we created in previous step.
2.3 Composing Spring Boot application
For this we step need a sample Spring Boot application.
You can use any Spring Boot application and provide its Dockerfile.
However in our code references we will use the Spring Boot application that we had created in previous blog.
The starting code of for this project can be found at https://github.com/chatterjeesunit/spring-boot-app/tree/v6.1
To checkout this Release tag, run following commandgit clone https://github.com/chatterjeesunit/spring-boot-app.git
cd spring-boot-app
git checkout tags/v6.1 -b v6.1
Add following service definition to the docker-compose.yml file
application:
  build:
    context: .   # Build path that contains the Dockerfile
    dockerfile: ./docker/Dockerfile.app-exploded
  ports:
    - 8080 # Container exposes port 8080, but not to host
  environment:
    SPRING_DATASOURCE_URL: 'jdbc:mysql://database:3306/testdb'
    SPRING_DATASOURCE_USERNAME: testdbuser
    SPRING_DATASOURCE_PASSWORD: dummyPass!
    SPRING_FLYWAY_URL: 'jdbc:mysql://database:3306/testdb'
    SPRING_FLYWAY_USER: testdbuser
    SPRING_FLYWAY_PASSWORD: dummyPass!
  networks:
    - internal-nw
  depends_on: # Specify dependency for this service
    - database
  restart: unless-stopped  # Restart on failures
The above code snippet does following
- Creates an service with the name as
application. - Provide
build contextinstead of a docker image, and provide the path to theDockerfilethat will be used to build the image and create the application container. - Specified environment variables to connect to MySQL. For the Mysql host name, we provide the service name of Mysql –
database - Specify the ports – we only specified the container port, and did not specify the host port mapping. So an ephemeral host port will be chosen for this container port.
- Provide list of other services on which our application service depends on. The services will be started in this order –
databaseservice first, and then its dependent service (application) - We also specified
restartproperty asunless-stopped. This ensures that our application will restart on failures.- This is important because first time when we run docker compose, the database service gets started but database takes some time to get up and running.
- As a result the application service fails with database connectivity error.
- But since we have specified the restart flag, it will automatically restart on failures, and finally start running when database is available.
This is all we need to start our Spring Boot Application container.
2.4 Composing Traefik load balancer
Last but not the least, we will provide service specification for the load balancer. Add following to docker-compose.yml
load-balancer:
  image: 'traefik:v2.3' #image tag
  command: >
    --providers.docker=true
    --providers.docker.exposedbydefault=false
    --entryPoints.http.address=":80"
    --accesslog
    --log.level=INFO
    --api=true
    --api.insecure=true  # not recommended for production
    --api.dashboard=true # enable dashboard
  ports:
    - "80:80"  # load balancer port
    - "8080:8080"  # management UI
  volumes:
    # traefik does its magic by reading information about running containers from the docker socket
    - "/var/run/docker.sock:/var/run/docker.sock:ro"
  networks:
    - internal-nw
    - outside-nw
  depends_on:
    - application
  labels:
    - traefik.enable=true
    # use localhost or your machine host name
    - traefik.http.routers.traefik_http.rule=Host(`dev-sandbox`)
    - traefik.http.routers.traefik_http.service=api@internal
    - traefik.http.routers.traefik_http.entrypoints=http
We will not go into much internals of Traefik load balancer properties. On high level we did following
loadbalancerservice depends onapplicationservice.- Can be accessed from host machine on port 80, and the management dashboard can be accessed on port 8080.
- Api Security for dashboard is turned off, for demo purpose.
- Provided host name as
dev-sandbox(we will access loadbalancer on this hostname of our machine, instead of localhost) - Provided a series of labels, to specify Traefik configuration properties.
We will also need to add some Traefik properties as labels in our application service.
labels:
  - traefik.enable=true
  # use localhost or your machine host name
  - traefik.http.routers.application.rule=Host(`dev-sandbox`)
  - traefik.http.services.application.loadbalancer.server.port=8080
We specified that Traefik routing is enabled for this container, and that requests from host dev-sandbox will be redirected to container’s port 8080
The complete docker-compose.yml can be found in the Github repository.
3.0 Running it all
We are now ready to run our application.
If you are using our application code, then you will need to build the code first to make sure the exploded jar is available for consumption by the Docker file.
Just run the command
./gradlew clean buildJarYou can find more details at our previous post.
3.1 Running from command line
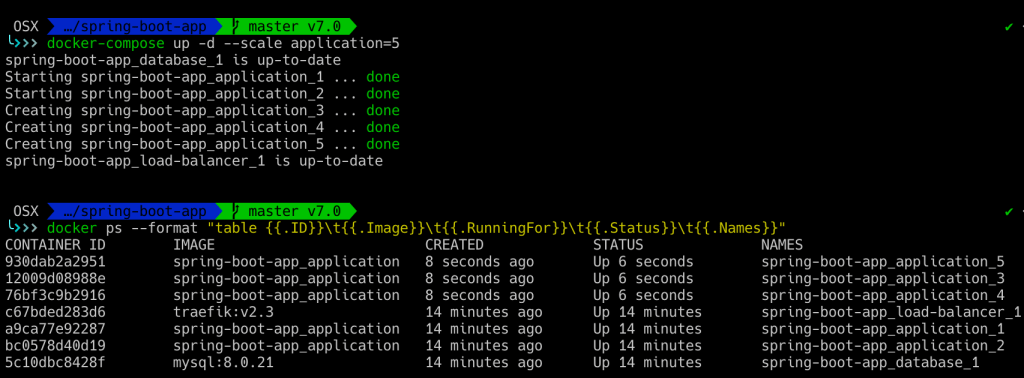
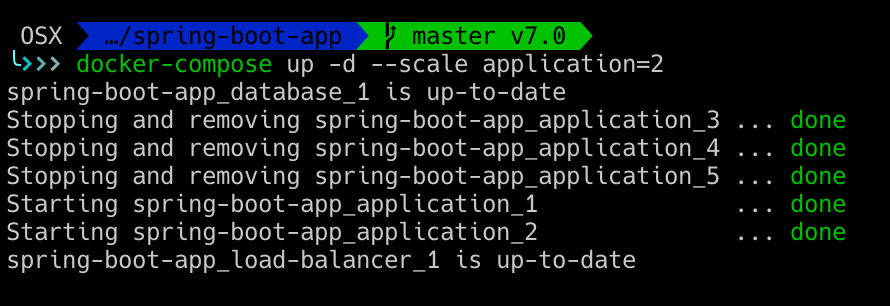
Go to command prompt and run this command to start the web application with two instances of Spring Boot application service.
docker-compose up -d --scale application=2You will see logs like this if you run it for the first time.

You can verify the docker containers using docker ps command.

You can access the application APIS on host
dev-sandbox(or your machine hostname).
Now lets scale up the application to 5 containers, by running the command
docker-compose up -d --scale application=5You will see output like this
To scale down the application run the command again by reducing the number of application services
To stop the entire application, run the command
docker-compose down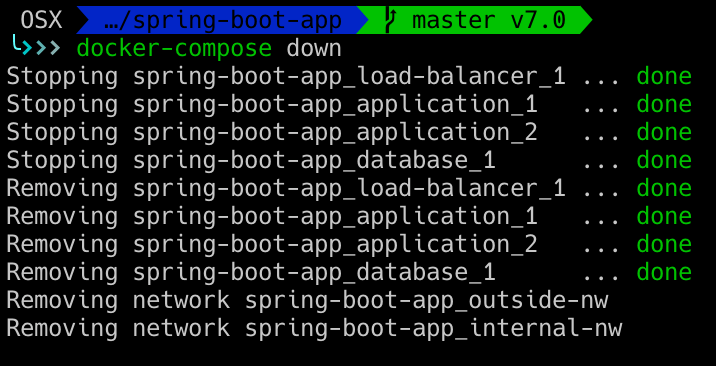
As you can see from above examples, it is now so easily to start/stop the application or scale it up or down using docker compose.
3.2 Running and monitoring using DockStation
In this last section we will look at a tool DockStation, which provides the same functionality via GUI. With this tool we would not need to run commands on command line.
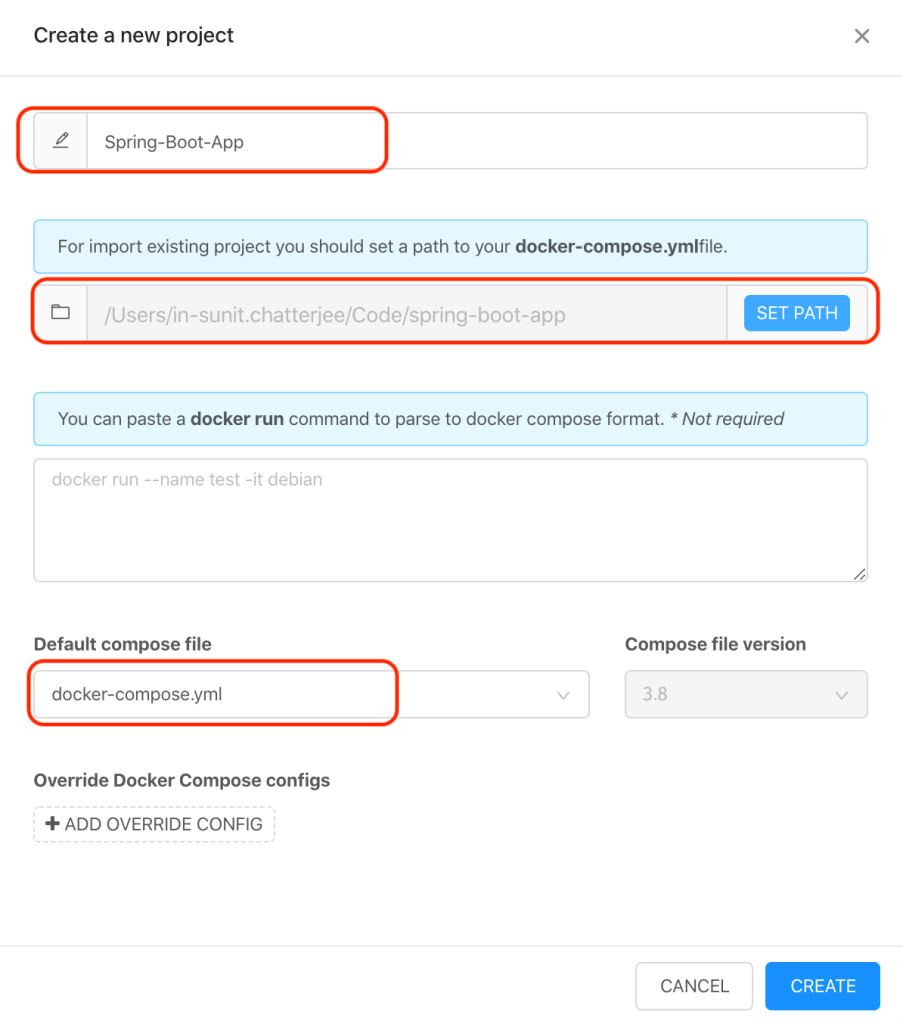
Install DockStation and run it.
Create new Project and specify the location of docker-compose.yml
Run docker compose directly from the UI. You can also see each container logs.
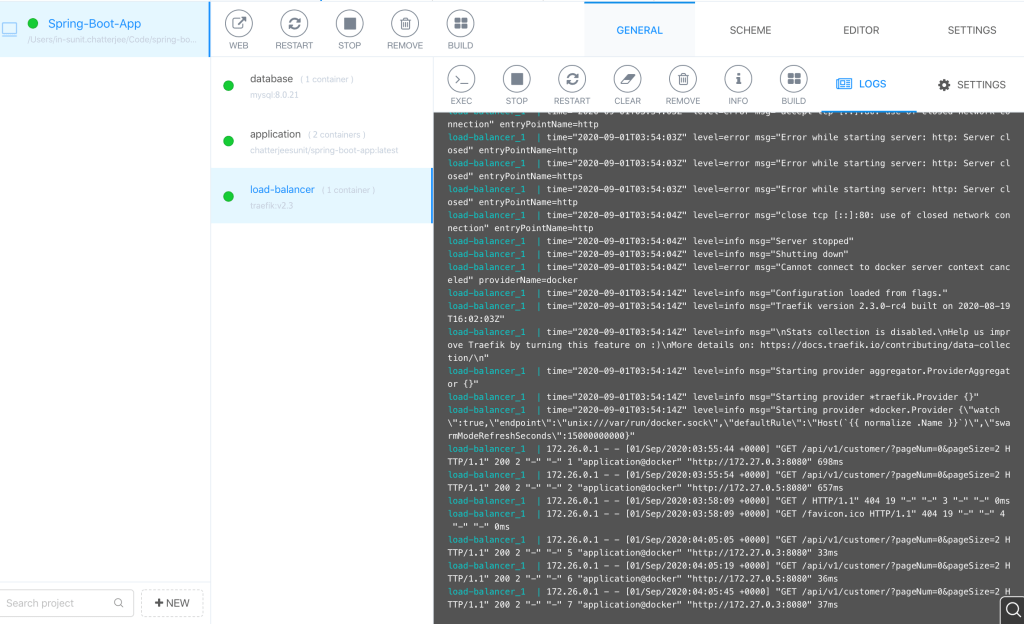
Hit one of the API of the application, and you can see in the load balancer logs that request is getting routed to two different application containers in round robin fashion

The only thing which I couldn’t find in DockStation, was how to scale up or down an application. I still had to do it via command line
With this we come to end of our blog on Docker Compose.
You can find the entire code at – https://github.com/chatterjeesunit/spring-boot-app/tree/v7.0
