
Amazon EC2 (Elastic Compute Cloud), is a service that provides scalable compute capacity in the cloud. It significantly reduces the time required to setup, configure and boot up a new server instances.
In this blog, we will demonstrate how to create a new EC2 instance and run a Tomcat Application Server on a EC2 Instance.
Table of Contents
Pre-requisites
- We assume you already have an AWS account that you can use.Since this is only a demonstration blog, we will not use high performance servers and try to make maximum use of AWS Free Tier
- You understand what a Tomcat Application server is
1.0 Creating an EC2 Instance
- Login to AWS Management Console – https://console.aws.amazon.com/console/home
- Go to >> Services >> Compute >> EC2 >> Create Instance >> Launch Instance
1.1 Choose an Amazon Machine Image (AMI)
- For our demo, we are selecting ‘Amazon Linux’ as an option

1.2 Choose Image Type
- Select size as
t2.micro, which is the smallest size we can take for our demo. - In actual deployments, please select a bigger size instance.

- DO NOT click on “Review and Launch”.
- Instead click on the button – “Next: Configure Instance Details”
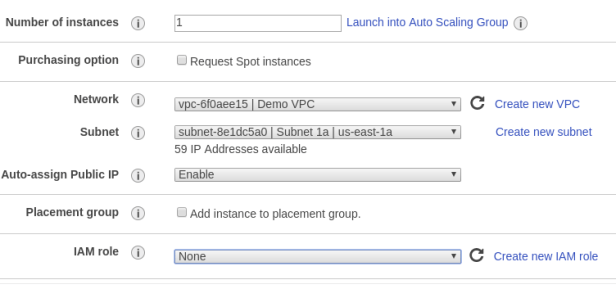
1.3 Configure Instance Details
- In the next steps, configure the details for your instance and select following options
- Number of Instances = 1
- Network = Either select the already created VPC Or Create a New VPC
- Subnet = Select any one of the available subnets. e.g – Subnet 1a | us-east-1a
- Assign Public IP
- Enable this option
- We want to connect to our EC2 instance from outside of VPC (e.g from our machine using SSH, etc)
- Network Interface >> Primary IP = Don’t add anything (Auto assign IP)
- Leave other options to their default values

1.4 Configure Storage
- Add Storage = 10GB (which should be more than enough for our demo)
- Select Volume Type = General Purpose SSD

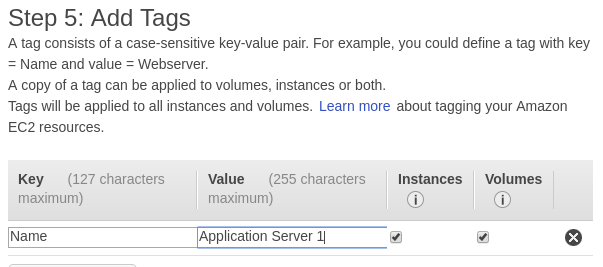
1.5 Add Tag
- Adding a tag helps identify the EC2 instance easily (when you create multiples of them)
- Add a Name Tag to the EC2 Instance
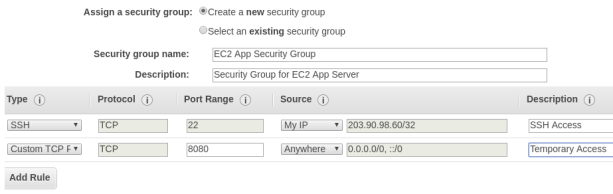
1.6 Security groups
- This is a very important security step.
- It controls the security of the EC2 instances and also defines who can access it and how.
- Create a new Security Group, and allow access on following ports
- SSH Access
- This type of access is required to connect to the EC2 instance and run commands / install softwares, etc
- Port = 22
- Allow access from “My IP”.
- It will allow access from you current machine IP Address
- TCP Access
- Since we are planning to install Tomcat Application server which runs on Port 8080, we will allow access to this port
- This is only for demonstration and testing purpose
- Ideally in a real use case, we will not expose the application server port directly, but instead it will be accessed through a Load Balancer or a Web Server.
- Port = 8080
- Allow from anywhere
- SSH Access
1.7 Creating Key Pair
- In order to SSH to the EC2 instance, you will need a private key.
- To generate and download the Private Key
- Create a new Key Pair (e.g with name as “AppServerKey”)
- Download Key Pair as
AppServerKey.pem
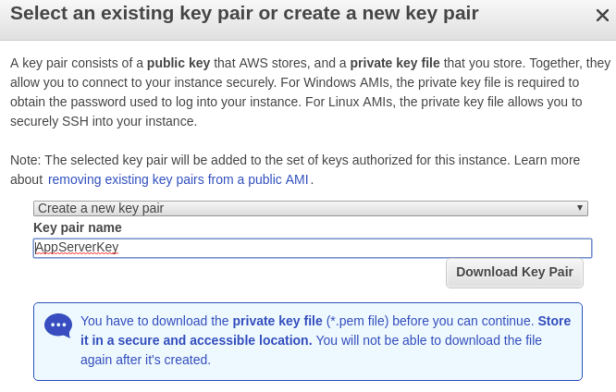
- Save this file properly, as you won’t be able to generate it again.
2.0 Connecting to EC2 Instance
To run commands within the EC2 Instance, you will need to connect to it.
If you are on Linux box, you can directly run following commands to establish a SSH connection to the EC2 Instance
- Change permission of the Private Key File (created in previous step)
sudo chmod 600 AppServerKey.pem - Find out the Public DNS of the EC2 Instance
e.g ec2-54-92-184-62.compute-1.amazonaws.com - Default user created is
ec2-user - You can now connect using the following SSH command
ssh -i @
e.g
-
ssh -i "AppServerKey.pem" ec2-user@ec2-54-92-184-62.compute-1.amazonaws.com
If you are on Windows, then you can use PuTTY, to connect to EC2 Instance
3.0 Install Java
There are two options for installing JDK
- Install Open-JDK
- Install Oracle JDK
We will go with second option and Install JDK 1.8. (You can install any other version too)
Connect to your EC2 instance by SSH and run following steps.
3.1 Create Folder for download
Create a folder for Downloads (option step)
mkdir -p Downloads
cd Downloads/
3.2 Download Oracle JDK
You can download using the command below
wget --no-check-certificate -c --header "Cookie: oraclelicense=accept-securebackup-cookie"
E.g to download JDK 1.8 we can run following
wget --no-check-certificate -c --header "Cookie: oraclelicense=accept-securebackup-cookie" http://download.oracle.com/otn-pub/java/jdk/8u171-b11/512cd62ec5174c3487ac17c61aaa89e8/jdk-8u171-linux-x64.tar.gz
3.3 Installing Oracle JDK
Run below commands to Install Java
cd /home/ec2-user/Downloads
sudo su

#Create the folder
mkdir /opt/java

#Copy and Extract JDK
cd /opt/java
cp /home/ec2-user/Downloads/jdk-8u171-linux-x64.tar.gz .
tar -xvf jdk-8u171-linux-x64.tar.gz
rm -f jdk-8u171-linux-x64.tar.gz

#update alternatives for java/javac/jar commands
update-alternatives --install /usr/bin/java java /opt/java/jdk1.8.0_171/bin/java 100
update-alternatives --install /usr/bin/javac javac /opt/java/jdk1.8.0_171/bin/javac 100
update-alternatives --install /usr/bin/jar jar /opt/java/jdk1.8.0_171/bin/jar 100

#Add environment variables
cd /etc/profile.d/
touch jdk.sh
echo "export JAVA_HOME=/opt/java/jdk1.8.0_171/" >> jdk.sh
echo "export JRE_HOME=/opt/java/jdk1.8.0_171/jre" >> jdk.sh
echo "export PATH=$PATH:/opt/java/jdk1.8.0_171/bin:/opt/java/jdk1.8.0_171/jre/bin" >> jdk.sh
Once above steps are done, reboot your EC2 Instance.
4.0 Download and Install Tomcat
Connect to your EC2 instance by SSH and run following steps.
4.1 Create a new user for Tomcat
- Create a new user – tomcat
- This is an optional step, and you may also choose to skip it.
sudo su
adduser tomcat
passwd tomcat
4.2 Download and setup Tomcat
For our demo purpose, we will use Tomcat 9.0.8
Download and extract Tomcat 9.0.8 to the home folder of the user
cd /home/ec2-user/Downloads

#Download Tomcat 9.0.8
wget http://www-eu.apache.org/dist/tomcat/tomcat-9/v9.0.8/bin/apache-tomcat-9.0.8.tar.gz

#Extract Tomcat
tar xvf apache-tomcat-9.0.8.tar.gz

#Move the extracted tomcat folder to home directory of the user
mv apache-tomcat-9.0.8 /home/ec2-user


#Add environment variables for CATALINA_HOME
cd /etc/profile.d/
touch tomcat.sh
echo "export CATALINA_HOME=/home/ec2-user/apache-tomcat-9.0.8".sh
Now the setup of tomcat is complete, and it can be run now.
5.0 Add startup Script for Tomcat Application
There is one more thing we need to do.
Generally we can start our tomcat server manually by running the startup.sh located in CATALINA_HOME/bin folder
However it will be too cumbersome to manually start Tomcat when our EC2 server is started. Ideally it would be good if Tomcat application auto-starts whenever our EC2 instance is started.
For this we will create a Tomcat Service and add it to the Linux Startup
- Create a file with name tomcat.service, within
/etc/systemd/systemsudo nano /etc/systemd/system/tomcat.service - Add below script to the above file –
tomcat.service.
Make sure to set the Tomcat and JDK path corectly.# Reference : http://techkube.com/article/how-install-tomcat-ec2-instance [Unit] Description=Apache Tomcat After=network.target [Service] Type=forking Environment=CATALINA_PID=/home/ec2-user/apache-tomcat-9.0.8/temp/tomcat9.pid Environment=JAVA_HOME=/opt/java/jdk1.8.0_171/ Environment=CATALINA_HOME=/home/ec2-user/apache-tomcat-9.0.8 Environment=CATALINA_BASE=/home/ec2-user/apache-tomcat-9.0.8 Environment="JAVA_OPTS=-Dfile.encoding=UTF-8 -Djava.awt.headless=true" ExecStart=/home/ec2-user/apache-tomcat-9.0.8/bin/startup.sh ExecStop=/home/ec2-user/apache-tomcat-9.0.8/bin/shutdown.sh User=ec2-user Group=ec2-user [Install] WantedBy=multi-user.target - Run below commands to run Tomcat as a service whenever the current EC2 instance starts.
sudo systemctl daemon-reload
sudo systemctl start tomcat
sudo systemctl enable tomcat
- You can manually start and stop tomcat using below commands also
sudo service tomcat start
sudo service tomcat stop
6.0 Testing Tomcat Application
Now start the tomcat application, and check if its running
Connect to http://:8080 to access the Tomcat Root application
e.g. On accessing http://ec2-54-234-212-57.compute-1.amazonaws.com:8080/, we should see a similar page as below

This completes our blog on setting up Tomcat Application server on AWS EC2.
