
In this blog, we will demonstrate how to set up an AWS environment from scratch (for deploying an enterprise web application). We will demonstrate how to create and configure VPC, Subnets, EC2 instances, MySQL RDS, Elastic Load Balancer. Post that we will deploy a simple Spring Boot Application on this AWS environment with high availability.
Our aim in this blog in not to focus on the Spring Boot application and its deployment, but instead focus on setting up AWS for deploying an enterprise web application (which in our case happens to be a simple Spring Boot application).
So get ready to dive-in and get your hands dirty.
Table of Contents
1.0 What we want to do?
We want to deploy a sample web application to AWS with High Availability.
In very simple terms, High Availability means – decreased downtime, and removing single points of failure.
If we have a single instance of application server/ single database instance, then the moment any server goes down the entire application is down. High Availability tries to solve this exact problem where the application should keep running even if any server goes down.
2.0 Prerequisites
2.1 Sample Web Application
- We will need a sample web application to deploy to AWS
- Since this is not a blog on how to create a sample web application, we will not focus on that aspect.
- For current blog, we have created a sample application using Jhipster. You can directly download the war file – demo.war (Recommended option)
- Or you can use any Spring Boot based application war file for this demo.
2.2 AWS Account
We assume you already have an AWS account that you can use.
Since this is only a demonstration blog, we will not use high performance servers and try to make maximum use of AWS Free Tier
Some of the concepts and installation steps that are required for this setup, have already been covered in few previous blogs. Hence we will not cover them in detail again, and will provide a link to previous blogs (wherever required)
3.0 Deployment Architecture
The entire application contains of following
- A VPC being created and divided into 4 different subnets.
- Tomcat Application running in each of the EC2 Servers.
- Each EC2 instance will be in a separate Availability Zone.
- A MySQL Database (Multi-AZ deployment)
- Elastic Load Balancer to route the requests to the application servers running on the EC2 Instances.
Don’t worry if you are not aware of some of the things mentioned above.
This is just to give a very high level idea of what we are trying to build. We will cover each once of the in much detail in following sections.
The following diagram represents the architecture of the above deployment.

4.0 Creating VPC & Subnets
- We will need to created a Virtual Private Cloud for our setup (or use an existing default one)
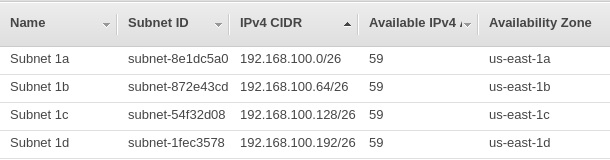
- Since we need to create four EC2 Servers running in 4 different AZ, hence we need to create 4 Subnets in our VPC, each one of them associated to a different Availability Zone.
- Here is a sample of what 4 subnets could possibly look like
Just in case you are still new to the concept of Regions/ AZ / VPC / Subnets / IPv4 CIDRs, etc and want to first learn how to create VPC and Subnets, then please refer to my earlier blog – How to Setup VPC and Subnets in AWS
5.0 Setting up MySQL RDS
We need to setup a Multi-AZ MySQL RDS inside our VPC that we created in above steps.
This has already been covered in my previous blog – How to setup database on AWS RDS
6.0 Setting up of EC2 Instances.
This is what we need to do now
- Create 4 EC2 instances in 4 different AZ
- Each of the EC2 Instance needs to satisfy following requirements
- Tomcat Application Server should be installed and configured on EC2 instance
- The application war file deployed on the Tomcat Server of each EC2 instance.
- Database connection properties should be configure in all of the application servers.
6.1 Setting up and configuring an EC2 Instance.
6.1.1 Tomcat Setup on EC2
We have already covered this topic in detail in our previous blog – How to setup Tomcat Application on AWS EC2
6.1.2 Deploy Application war file
We will need an application war file to deploy to tomcat.
For our demo purpose we have used a Jhispter Demo Application war file.
You can use the same or use any of your application war file for this purpose.
Copy it to the webapps folder of tomcat
cd /home/ec2-user/apache-tomcat-9.0.8/webapps
wget https://github.com/chatterjeesunit/jhipster-demo/raw/master/war/demo.war
This will deploy the application in Tomcat, and it can be accessed using the url – http://:8080/demo
6.1.3 Configuring Database connection for Application Server.
- Since this is a Spring Boot application, the database connection properties are stored at following file within the application war –
demo.war/WEB-INF/classes/config/application-prod.yml
spring:
  devtools:
      ...
  datasource:
      type: com.zaxxer.hikari.HikariDataSource
      url: jdbc:mysql://localhost:3306/demo?useUnicode=true&characterEncoding=utf8&useSSL=false
      username: root
      password: r00t
  ...
  ...
- We need to modify these default database connection properties.
- One very simple open is to modify this
application-prod.ymlfile within the war file and deploy it. - But we should avoid taking this approach, as any change in database connection property will always require us to modify the war file. And database connections can change, e.g password, database URL, etc.
- We should be able to do it externally, without modifying the war file.
Thankfully Spring Boot provides sus a way to Configure External JDBC Properties for a Spring Boot Application
Create application-prod.properties
- Create a file with name as
application-prod.properties - Add following properties to it
- Spring Datasource URL
- Spring Datasource Username
- Spring Datasource Password
- Place this file within
conffolder of tomcat
# Go to "conf" folder of tomcat
cd /home/ec2-user/apache-tomcat-9.0.8/conf

# Remove existing properties file (if any) and create a new one
rm -f application-prod.properties
touch application-prod.properties

# Add properties for Spring datasource URL/ Username/ Password
echo "spring.datasource.url=jdbc:mysql://rds-demo.c4cjbtlqf6yt.us-east-1.rds.amazonaws.com:3306/testdb?useUnicode=true&characterEncoding=utf8&useSSL=false" >> application-prod.properties
echo "spring.datasource.username=root" >> application-prod.properties
echo "spring.datasource.password=welcome123#" >> application-prod.properties
Configure tomcat to use this External Application Properties
Now we need to tell our Spring Boot application, where to pick up the updated application properties. We can do this by adding a System property of spring.config.location
We can do so by adding this configuration to following file – /bin/setenv.sh
cd /home/ec2-user/apache-tomcat-9.0.8/bin
touch setenv.sh

# Add configuration as SPRING_CONFIG_LOCATION
# instead of spring.config.location, because of restrictions in Unix.
echo "export SPRING_CONFIG_LOCATION=/home/ec2-user/apache-tomcat-9.0.8/conf/" >> setenv.sh
Now our tomcat application is fully setup and ready to run.
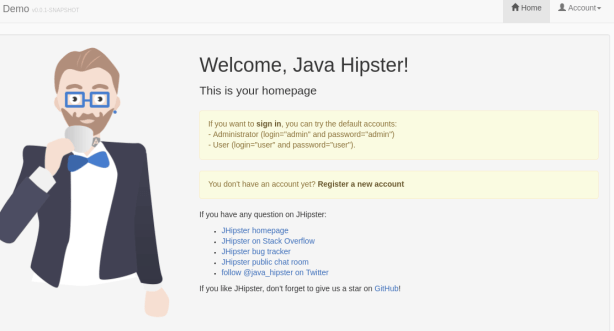
6.1.4 Testing the Spring Boot Application
Re-start the Tomcat Server
Hit the following URL – http://:8080/demo
e.g http://ec2-54-234-212-57.compute-1.amazonaws.com:8080/demo
You should see the application home page loading up (which is the Jhipster home page for our application)
6.2 Creating an Image of EC2 Instance
Now we will create a backup image of our EC2 Instance.
We do this for 2 reasons
- Keep a backup, so that we can restore our EC2 instance again if required.
- Use this image to create many more E2 instance in few clicks (without having to do the full setup again and again)
To create a backup image, follow the steps below.
- Select your EC2 Instance >> Go to Actions >> Image >> Create Image
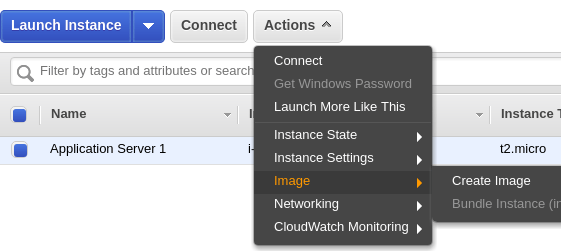
- Create an Image with default options, and provide a name and description for it
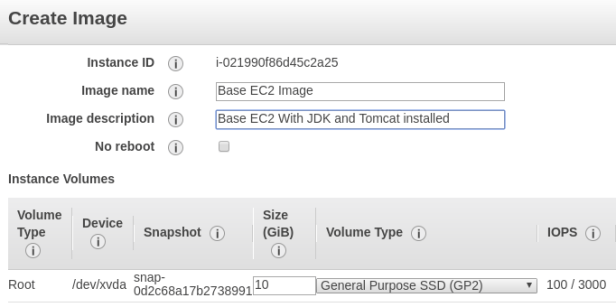
- Once done you can view the images under EC2 >> AMI section

6.3 Creating additional EC2 from the AMI
Now we want to create 3 additional EC2 Instances in 3 different AZ, and configure and run tomcat application from it.
The beauty of creating the AMI in previous step, is that we don’t have to repeat all the steps for EC2 instance creation. We can directly create new EC2 instances from the Image, and just run it as is.
This makes the process of spawning new instances very very easy
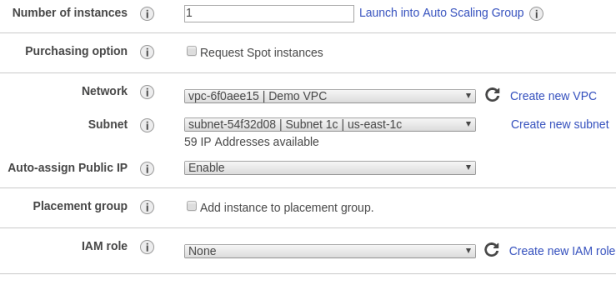
- Select an AMI Image >> Go to Actions >> Launch

- Select Instance size as
t2.microagain

- Select Subnet as a different subnet now (e.g Subnet 1c)
- All other options remain same as the first EC2 instance creation.
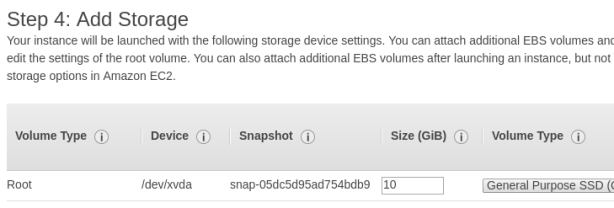
- Add Storage
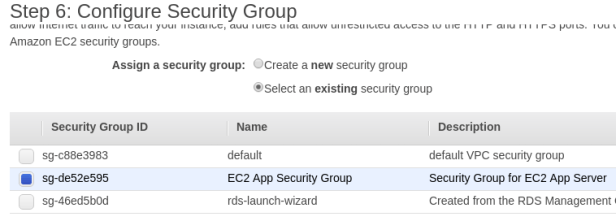
- Configure Security Group, and select the EC2 Security Group created earlier.
- Select the existing Key Pair – AppServerKey, for Private Key.
This will enable that you can connect to any EC2 instance with the same key.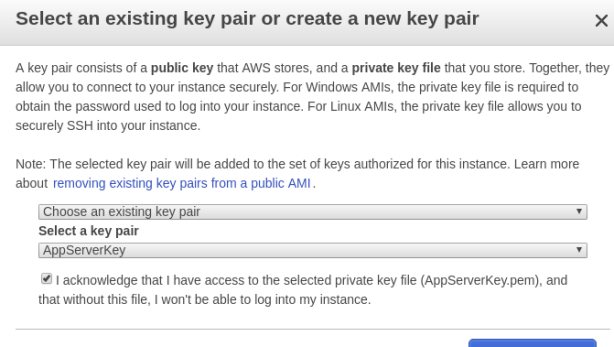
Repeat above steps and create two more EC2 Instances in two different AZ
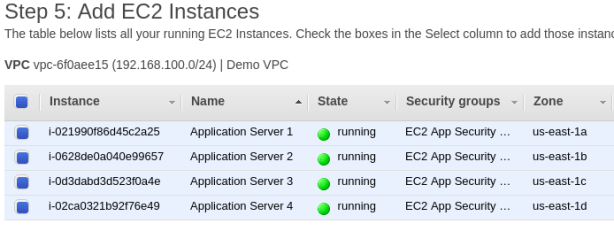
Once done, we will have four EC2 Instances running tomcat application in four different AZ (as shown below)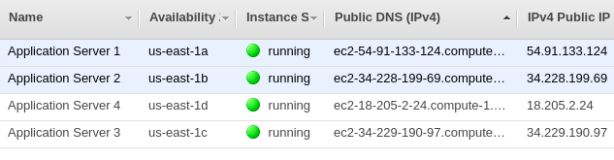
7.0 Setting up Elastic Load Balancer (ELB)
We have most of the components setup till now (VPC / Subnets / RDS / EC2)
What’s remaining is creation of an Elastic Load Balancer to route the requests from clients to the EC2 Instances.
7.1 Creating an ELB
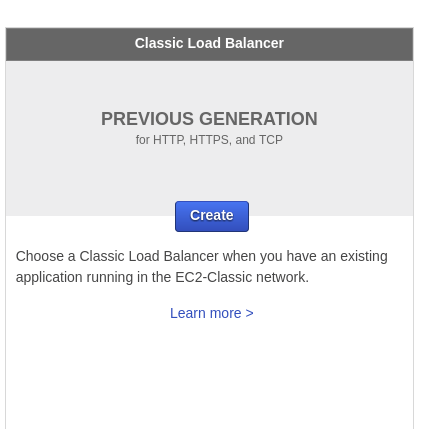
- Go to AWS Console >> Services >> EC2 >> Load Balancing >> Load Balancers >> Create Load Balancer
- Create a Classic Load Balancer
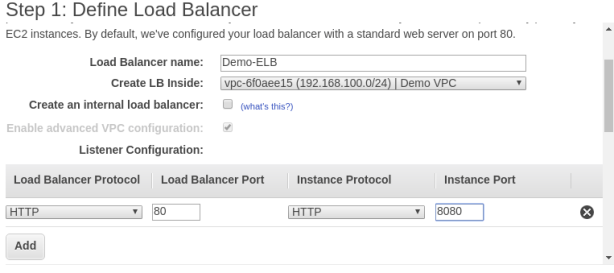
- Provide a name for the ELB
- Create LB inside our ‘Demo VPC’
- Add HTTP Listener configuration -> from Port 80 to port 8080
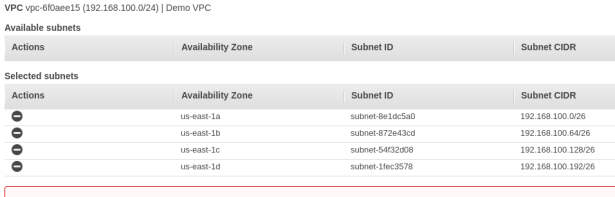
- Select all 4 Subnets for this ELB
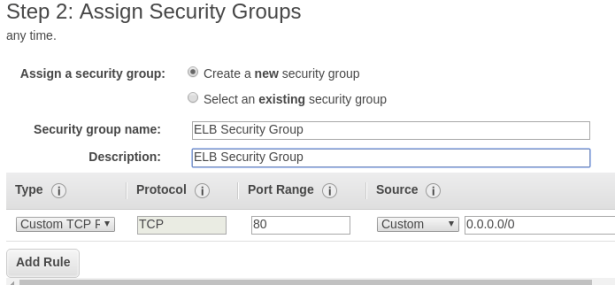
- Create a new Security group for the ELB, and allow access to ELB on port 80 from any IP Address
- This will enable ELB to get requests from clients on port 80, and it will then route the requests to port 8080 of the EC2 instances
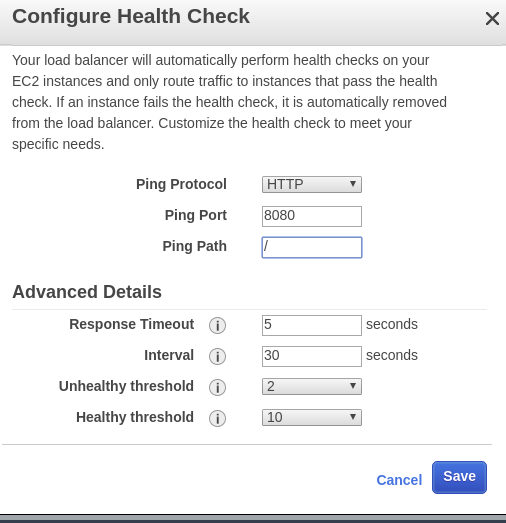
- Configure health checks for ELB – Leave it default values for now.
- Change ping path to “/”
- Add all four EC2 instances to the ELB
- This will enable ELB to route requests to any one of them.
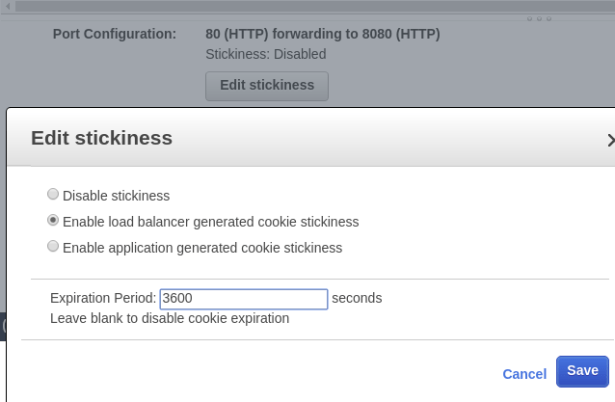
- By default, a Classic Load Balancer routes each request independently to the registered instance with the smallest load.
- However, you can use the
sticky sessionfeature (also known assession affinity), which enables the load balancer to bind a user’s session to a specific instance. - This ensures that all requests from the user during the session are sent to the same instance.
- Select the option – “Enable load balancer generated cookie stickiness”
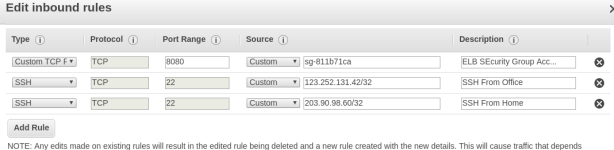
7.2 Modifying EC2 Security group to allow access from the ELB
There is one small change remaining to be done. We need to modify our EC2 Security group to allow access to it on port 8080 from the ELB instance
- Go to EC2 >> Security Groups
- First copy the security group Id ‘ELB Security group’
- Then edit the EC2 Security group
- Remove all access on port 8080
- Add Custom TCP access on port 8080 and paste the ‘ELB Security Group ID’ into it.
8.0 Testing the application
We can now access our application directly on the ELB url. – http://demo-elb-2147012866.us-east-1.elb.amazonaws.com/demo
But the main question here is how do we test High Availability of application?
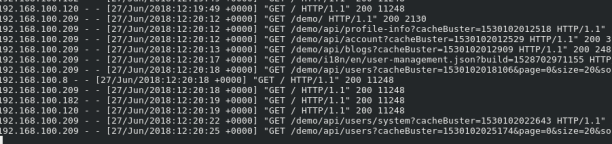
To test and verify that we will also need to see which EC2 the requests are getting routed to. We can check that by
- SSH to each of the four EC2 servers simultaneously
- View Tomcat access logs of each EC2, by running command
tail -f apache-tomcat-9.0.8/logs/localhost_access_log..txt
e.g.
tail -f apache-tomcat-9.0.8/logs/localhost_access_log.2018-06-27.txt
- Access the Demo Application via the ELB url
- You can see URLS like “GET /demo/…..” in one of the EC2 access logs only, which means ELB is routing requests to this EC2
Now go to AWS Console and STOP the EC2 Instance which was getting requests from ELB. This means one of the EC2 server went down. Access the URL again, and you will notice that the application did not went down. Instead ELB routed the requests to any one of the remaining EC2 instances.
Hence our application is now deployed with High Availability, which means it will keep running even if any of the application server went down.
With this we come to the conclusion of our blog.
In the next blog we will look at how we can use Elastic BeanStalk to do the same deployment instead of manually creating EC2/ELB instances.
