
In this blog, we will demonstrate how to set up and use a database on AWS RDS from scratch.
Table of Contents
1.0 What is AWS RDS
AWS RDS is the on-cloud Relational Database Service provided by Amazon.
It supports many databases
- MySQL
- PostgreSQL
- Oracle
- MariaDB
- SQL Server, etc
It also provides Data Migration Services to migrate data from one type of database to other.
1.1 Benefits of AWS RDS
- Easy Setup
- Quick and easy way to setup and provision database instances (often with few mouse clicks)
- Scalability
- Can easily scale CPU and Memory resources for the RDS Instances
- Can also scale via Read Replicas (for read-heavy systems)
- Availability and Durability
- Ability to take snapshots of database and create new instances from the snapshot (if required)
- Multi-AZ Deployments
- Amazon RDS automatically creates a primary DB Instance and synchronously replicates the data to a standby instance in a different Availability Zone (AZ).
- Each AZ runs on its own physically distinct, independent infrastructure.
- In case of an infrastructure failure in the primary AZ, Amazon RDS performs an automatic failover to the standby instance in other AZ.
- Endpoint for the database also remains same after the failover is complete.
- So the application can resume database operation without the need for manual administrative intervention
2.0 Setting up RDS (MySQL)
We assume you already have an AWS account that you can use.
Since this is only a demonstration blog, we will not use high performance servers and try to make maximum use of AWS Free Tier
Although we can setup any type of database, we will demonstrate the setup of MySQL Server on AWS.
2.1 Database Parameter group
2.1.1 What is a Database Parameter Group
- Any database setup requires lots of configuration. e.g Database Collation, Auto commit (on/off), encryption settings, etc and a lot of other configurations.
- RDS allows us to put all such configurations in one place called as, Database Configurations groups
- We can create multiple such configuration groups based on environments or database types.
- This is very helpful because when we have to create a new database instance again, we need not configure it from scratch again. We can just use one of the database configuration group created earlier.
2.1.2 Creating a Database Parameter Group
- Login to AWS Console
- Go to RDS Home – https://console.aws.amazon.com/rds/home
- Go > Parameter groups >> Create Parameter Group
Enter details as shown below
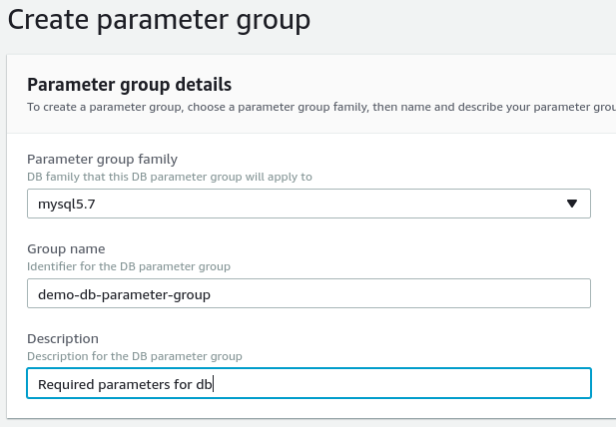
- Add the properties, as shown in image below.
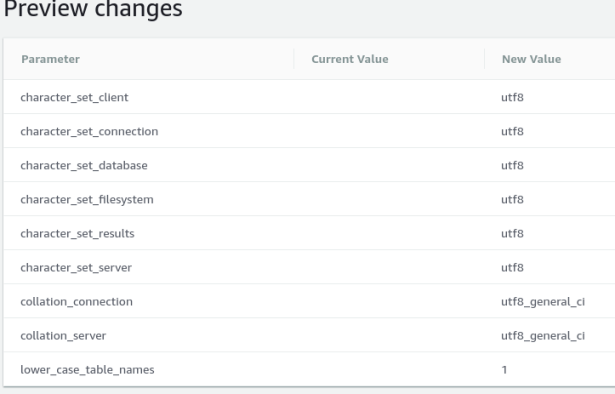
2.1.3 Some Recommended Settings for MySQL
- Character Set/ Collation
- Set most of them to
utf8 - This is essential so that our database can store all type of Unicode characters and not just English letters.
- Set most of them to
lower_case_table_names- Set this to 1.
- By default, table names are case-sensitive on Unix, but not so on Windows or macOS
- If table names are case sensitive then it can cause some SQL queries to fail (e.g select * from User would not be the same query as select * from user
- Ideally we need to make the table names as case insensitive.
- Setting this property to 1 means all tables will be in lower case.
2.2 Creating a RDS Instance
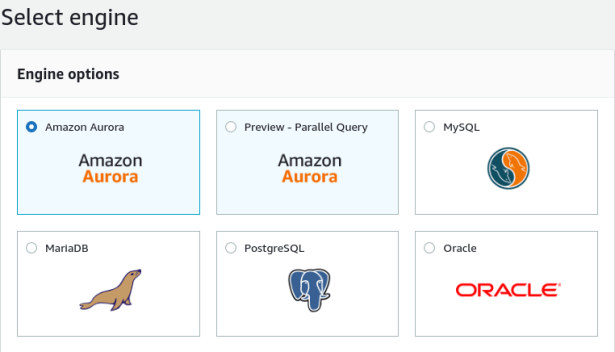
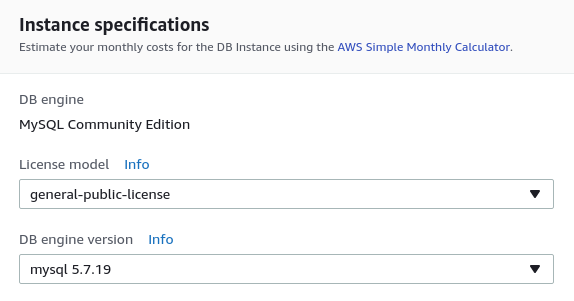
2.2.1 Database Engine
- We will choose MySQL for our demonstration
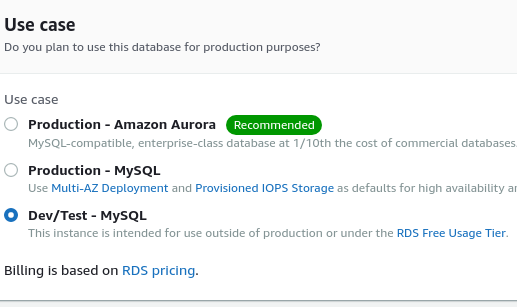
2.2.2 Database Type And Version
- For our demo, we are choosing ‘Dev/Test’, however we should choose ‘Production’ for actual deployments.
- Select MySQL DB Engine version
We have selected version as 5.7.19
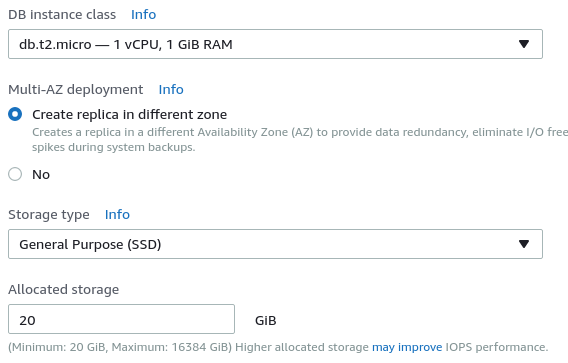
2.2.3 Instance Configuration
- We are choosing the lowest possible configuration of database for our demo –
db.t2.micro– to avoid cost. - But in real scenarios, we should choose a database configuration that is more powerful.
- Also select the option for
Multi-AZ deployment - Select storage size as 20 GB
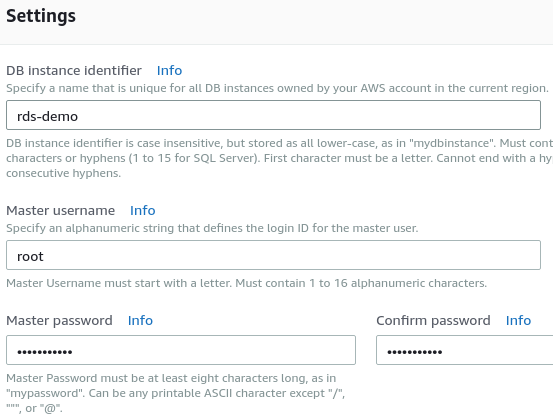
2.2.4 Database Identifier, Username/passwords
- Set up an identifier for database instance.
- And set a master username and password for the database.
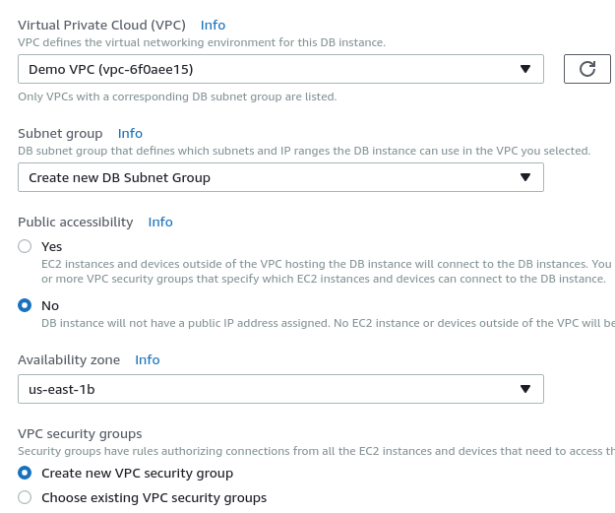
2.2.5 VPC and Subnets
- If you already have a VPC created, then select it OR create a new one.
- Select the option to “Create a new Subnet Group”
- Public Accessiblity
- Generally the database will be mostly accessible from the Application servers only (from EC2 Instances within the AWS Virtual Private Cloud). As a result it does not needs a public IP address.
- Hence we setting the Public Accessiblity to “No”
- Set this to “Yes” only if you want to access this database to have a public IP Address
2.2.6 Database Schema
- Next create a database schema
- Associate the database parameter group created earlier
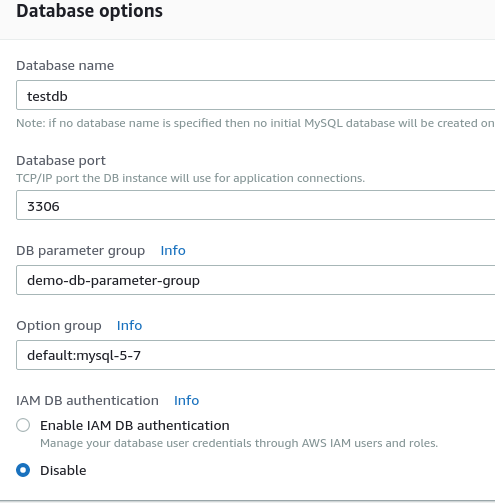
- And that’s it.
- Finish the setup and database is ready for use
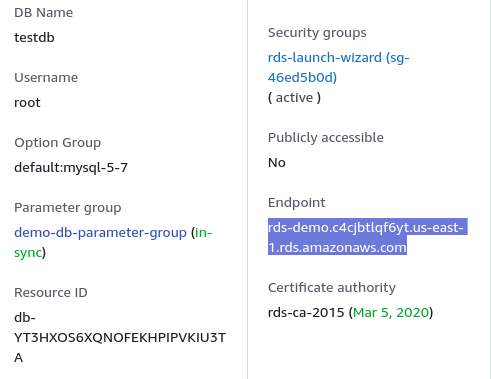
- Check the details and find out the database ‘Endpoint‘ and copy it.
- We will need this to connection our Application server to the database.
2.2.7 Configuring Security
This is a very important step for database security.
We want to control who can access our database and on what ports.
We can achieve this by the means of a Security Group.
- We want to give access on Port
3306(MySQL Port) on TCP Protocol to a particular Subnet of our VPC. - Suppose this subnet is
192.168.100.0/24, i.e., IP Address in range from
192.168.100.0to192.168.100.63 - To do this, select the security group for the database, and edit the “Inbound Rules”, as shown below

And that completes our RDS setup.
3.0 Connecting to an RDS Instance
There will be some scenarios where you need to connect to MySQL RDS to run queries.
Since we have not given public access to MySQL RDS, you will have to access it from the EC2 Instance (after doing SSH to it)
First Install MySQL client on the EC2 instance
sudo yum install mysql
Then you can connect to MySQL like this.
mysql -h rds-demo.c4cjbtlqf6yt.us-east-1.rds.amazonaws.com -u root -p
