
Regions, Availability Zones, VPC and Subnet are very core concepts to any AWS setup. In this blog we will understand more about these and also how to setup up VPC and Subnets.
Table of Contents
1.0 Understanding Regions, AZ, VPC and Subnets
1.1 Regions and Availability Zones
- AWS infrastructure is spread across multiple geographical areas.
- Each such geographical area is known as
Region. - Regions are then divided into
Availability Zones(AZ), which are effectively isolated locations within the same Region (connected through low latency links). - By launching instances in separate Availability Zones, we can protect our applications from the failure of a single location.
- For more information please refer to following article – Regions & Availability Zone Concepts
In our current demo, we will use the Region – US East (N. Virginia) – us-east-1
This region has six AZ : us-east-1a, us-east-1b, … us-east-1f.
We will be using 4 of these AZ, for deploying our application servers.
1.2 VPC (Virtual Private Cloud)
- VPC (Virtual Private Cloud) is a virtual network dedicated to our AWS account.
- Each VPC is assigned a IPv4 CIDR block in the format of X.X.X.X/n
e.g 192.168.100.0/24 - Let’s understand what this IPv4 CIDR signifies, by taking an example.
- Let’s take an example –
192.168.100.0/24. This means- First 24 bits of the IP Address are used for network routing.
- Only last 8 bits (32 – 24) of the IP address will be available to us.
- Signifies that IP Address range from 192.168.100.0 to 192.168.100.255, is available to us
- This signifies 2^8 or 256 IP Addresses.
- In reality 254 IP address only, since first one is reserved for host and last one as a broadcast address.
- Let’s take another example –
192.168.100.64/26- This means first 26 bits are available for network routing, and last 6 bits (32 – 26), are only available to us.
- This signifies 2^6 or 64 IP Addresses.
- Signifies that IP Address range from 192.168.100.64 to 192.168.100.127, is available to us.
- Let’s take an example –
- If you want learn more about IP Address/CIDR, etc., then please refer to following article – Understanding IP Addresses, Subnets, and CIDR Notation for Networking
1.3 Subnets
- Subnets are logical divisions of a VPC
- We can define a subset of IPv4 CIDR block for each subnet.
- The subnet IPv4 block must be within the IPv4 block of the VPC.
- Suppose we have to divide the VPC
192.168.100.0/24into 4 subnets.- We have 8 bits available and we need to create 4 subnets.
- Each subnet will now have 2^6 IP addresses (2^8 / 4 = 256 /4 = 64 = 2^6)
- Hence we will take a /26 block for the subnets (32 – 6 bits), which will result in below subnet ranges
Subnet IPv4 CIDR Block IP Address From IP Address To Subnet 1 192.168.100.0/26 192.168.100.0 192.168.100.63 Subnet 2 192.168.100.64/26 192.168.100.64 192.168.100.127 Subnet 3 192.168.100.128/26 192.168.100.128 192.168.100.191 Subnet 4 192.168.100.192/26 192.168.100.192 192.168.100.255
- A VPC can span across multiple AZ, but each Subnet must belong to ONLY 1 AZ.
- For more information refer to following article – VPC and Subnet Basics
2.0 Steps for Creating VPC and Subnets
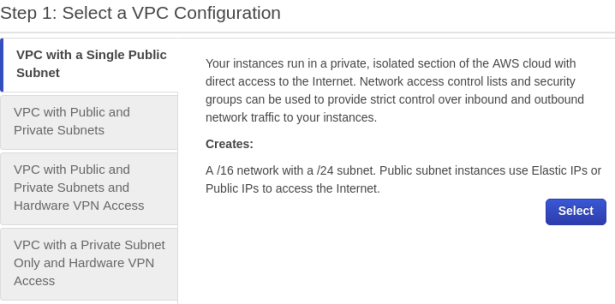
- Go to following AWS Console > Services > Search and Select VPC (https://console.aws.amazon.com/vpc/home?region=us-east-1)
- Create a VPC with Single Public Subnet to start with.
- We will add additional subnets later on.
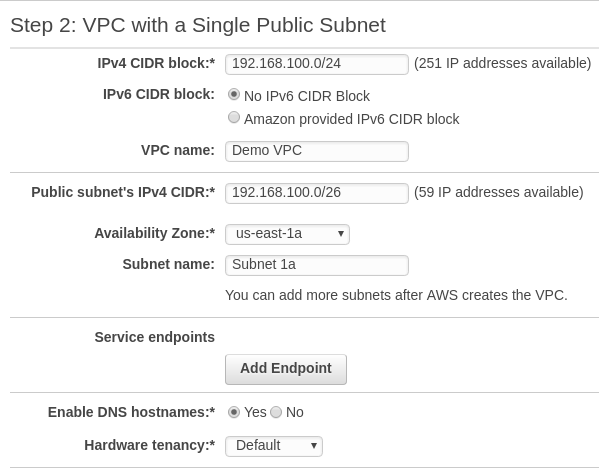
- Select IPv4 CIDR block as
192.168.100.0/24 - Give it a name –
Demo VPC - Create first subnet
- with IPv4 CIDR Block as
192.168.100.0/26(we need to divide the VPC into 4 subnets, so a /26 block) - Select AZ as
us-east-1a - Give it a name as
Subnet 1a
- with IPv4 CIDR Block as
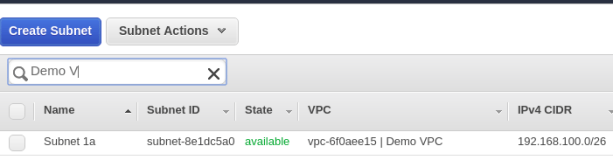
- Save the configuration
- You can now see that one subnet has been created.
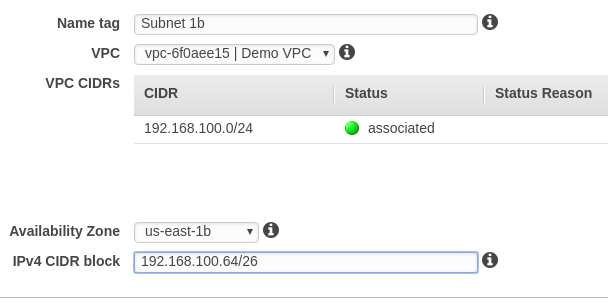
- Now lets create another subnet –
Subnet 1b - Select the same VPC, we created earlier
- Select a different Availability zone this time –
us-east-1b - Select next available IPv4 CIDR block –
192.168.100.64/26 - Save the configuration
- Similarly create third subnet in AZ –
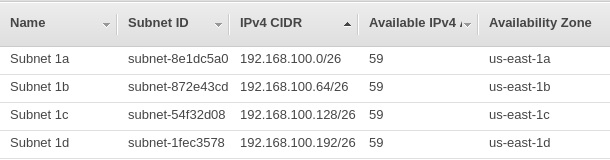
us-east-1c, and fourth subnet in AZus-east-1d - Once all four subnets have been created, you can see something like this below
3.0 Modifying the route tables
- Go to Services >> VPC >> Route Tables (https://console.aws.amazon.com/vpc/home?region=us-east-1#routetables: )
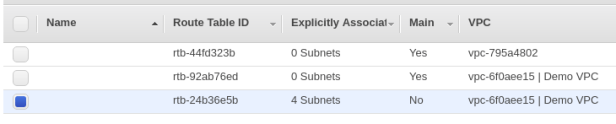
- Once the VPC and subnets have been created successfully, the default Route tables will be automatically created.
- You can see two route tables created for our VPC (“Demo VPC”)
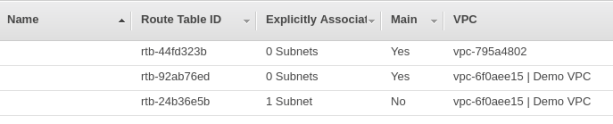
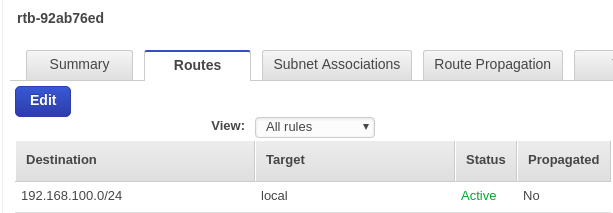
- Check details of the Main Route table for “Demo VPC” – You can see that is it not connected to any Internet Gateway
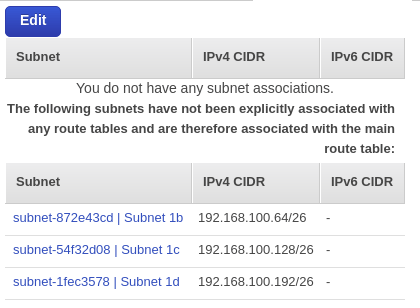
- And there are 0 subnets associated with this Route table
- Now check the details for the second Route table
- You can see it is connected to an Internet Gateway – igw-1259036a
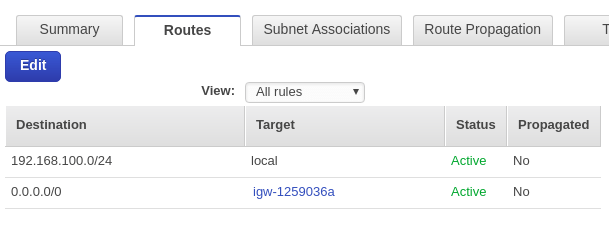
- And it only has Subnet 1a, associated to it.
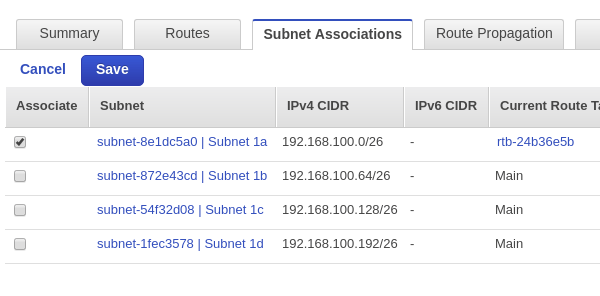
- Associate all subnets to this route table – This is very important.
- Unless, you do this these subnets cannot be accessed from the internet, since they are not connected to any route table which is connected to the internet.
- Once you associate all subnets to this Route table, you can see 4 subnets associated to the second route table.
With this we come to the conclusion of our blog.
Please leave back any comments/ feedback that you may have on the same.
