
In this article we will demonstrate how to set up a sample Spring Boot project, how to use Spring Data JPA to connect to a MySQL database, and build and expose REST APIS.
The entire code of for this project can be found at https://github.com/chatterjeesunit/spring-boot-app/tree/v1.0

To checkout this Release tag, run following command

git clone https://github.com/chatterjeesunit/spring-boot-app.git
cd spring-boot-app
git checkout tags/v1.0 -b v1.0-spring-boot-base
Note: The commands used in this article are run on Linux system, but similar commands will work on Windows system also. Additionally we have used IntelliJ Idea as an IDE in our example, but the same project can be setup on Eclipse also.
Pre-requisites:
1. Readers of this article should have some familiarity with Gradle, Rest APIs, Spring beans and dependency injection, etc.
2. MySQL is already installed and available, and a sample database is already created.
1.0 Create a Spring Boot Project
1.1 Downloading the blank project template
Go to http://start.spring.io/, and create a new project with following dependencies – Web / JPA / MySQL / Lombok / Aspects / Security / Redis / Cache
Only Web / JPA / MySQL is required.
All other are optional for a creating a basic spring boot project. We have added them here, because we will use them later for adding caching/security/AOP features in our Spring project.

Click on ‘Generate Project‘ to download the project zip file.
1.2 Opening Project in IDE
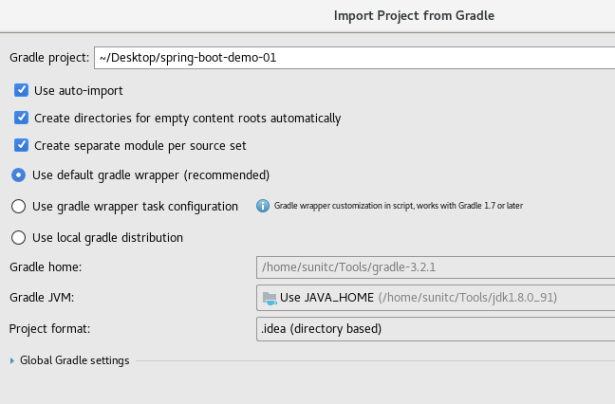
Unzip the zip file and Import Project in IntelliJ Idea / Eclipse to setup the project in your IDE.
Since it is a gradle project, select the ‘build.gradle‘ file of the unzipped project folder.

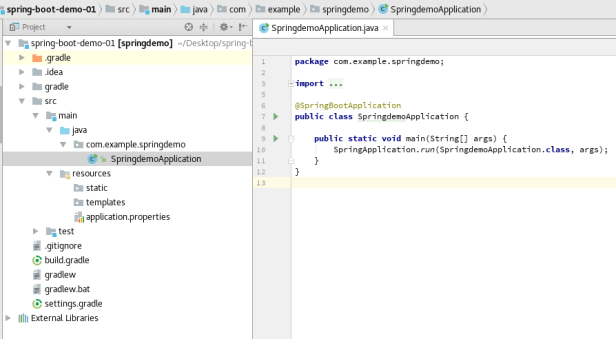
Once this is complete, IntelliJ Idea will load the sample project as shown below
2.0 Building and Running the Spring Boot Project
2.1 Build.gradle
Modify the build.gradle and comment out the libraries that you don’t need for now. So comment out AOP Aspects / Redis / Security / Cache
compile('org.springframework.boot:spring-boot-starter-aop')
compile('org.springframework.boot:spring-boot-starter-data-redis')
compile('org.springframework.boot:spring-boot-starter-cache')
compile('org.springframework.boot:spring-boot-starter-security')
Also if you are using IntelliJ Idea as your IDE, then add the following plugin
apply plugin: 'idea'
Once you are done, the build.gradle should look like this
buildscript {
   ext {
      springBootVersion = '2.0.1.RELEASE'
   }
   repositories {
      mavenCentral()
   }
   dependencies {
      classpath("org.springframework.boot:spring-boot-gradle-plugin:${springBootVersion}")
   }
}

apply plugin: 'java'
apply plugin: 'eclipse'
apply plugin: 'idea'
apply plugin: 'org.springframework.boot'
apply plugin: 'io.spring.dependency-management'

group = 'com.dev'
version = '0.0.1-SNAPSHOT'
sourceCompatibility = 1.8

repositories {
   mavenCentral()
}


dependencies {
// compile('org.springframework.boot:spring-boot-starter-aop')
   compile('org.springframework.boot:spring-boot-starter-data-jpa')
// compile('org.springframework.boot:spring-boot-starter-data-redis')
// compile('org.springframework.boot:spring-boot-starter-cache')
// compile('org.springframework.boot:spring-boot-starter-security')
   compile('org.springframework.boot:spring-boot-starter-web')
   runtime('mysql:mysql-connector-java')
   compileOnly('org.projectlombok:lombok')
   testCompile('org.springframework.boot:spring-boot-starter-test')
   testCompile('org.springframework.security:spring-security-test')
}
2.2 Running the project
Open a command terminal, and run following command to build and run
[sunitc@sunit-hp spring-boot-demo-01]$ ./gradlew bootRun
Once your run the above command, your will get below error, because the Mysql Datasource is not yet configured.
***************************
APPLICATION FAILED TO START
***************************

Description:
Failed to auto-configure a DataSource: 'spring.datasource.url' is not specified and no embedded datasource could be auto-configured.
Reason: Failed to determine a suitable driver class

Action:
Consider the following:
 If you want an embedded database (H2, HSQL or Derby), please put it on the classpath.
 If you have database settings to be loaded from a particular profile you may need to activate it (no profiles are currently active).
You can configure the datasource by modifying the application.properties file, which is located at – src/main/resources/application.properties
This file is currently empty.
Open this file and add the database configuration properties as given below.
(Change the properties to match the database connection properties of your system).
spring.jpa.hibernate.ddl-auto=update
spring.datasource.url=jdbc:mysql://localhost:3306/test
spring.datasource.username=admin
spring.datasource.password=welcome
spring.datasource.driverClassName=com.mysql.jdbc.Driver
For more information on the datasource properties, check the Spring documentation.
Then run below command again to build and run
[sunitc@sunit-hp spring-boot-demo-01]$ ./gradlew bootRun
You will get following output in console, which shows that your Spring application has started.
[ main] com.dev.springdemo.SpingDemoApplication : Started SpingDemoApplication in 5.126 seconds (JVM running for 5.547)
 75% EXECUTING [22s]
> :bootRun
3.0 Adding code to the project.
The main application class should always be placed in base package above all other packages/classes. This will help Spring to auto-scan for all the components/entities, etc.
The following listing shows a typical layout of a spring boot application
com
 +- example
     +- myapplication
         +- Application.java //Main Application class
         |
         +- customer
         |   +- Customer.java   //Bean or Entity Definition
         |   +- CustomerController.java  //Rest Controller
         |   +- CustomerService.java   //Service API
         |   +- CustomerRepository.java  //DAO or JPA Repository
         |
         +- order
             +- Order.java
             +- OrderController.java
             +- OrderService.java
             +- OrderRepository.java
Please refer to Spring Boot Documentation for more details.
3.1 Creating Entities
In this project, you will be creating two entities – Customer and Address
- Customer and Address.
- Each Customer can have multiple Addresses, i.e., there is One to Many relationship from Customer to Address.
- Customer is stored in person table.
- Address is stored in address table has a customer_id column that has a foreign key relationship to Customer table.
Note: No tables have yet been created in the mysql database.
Since we have defined following properties in datasource configuration :
spring.jpa.hibernate.ddl-auto=update, the tables will be auto-created based on how the Entities are defined.
We will be using LOMBOK annotations while defining the entity classes. Using Lombok you can AVOID creating all the boiler plate code that you need to add to the Bean/Entities, i.e., Getters/Setters , Constructors, toString, equals /hashCode, etc.
All you need to do is add the right Annotations. For more information on Lombok please refer to lombok documentation.
Following are the sample Entity classes
@Data
@NoArgsConstructor
@RequiredArgsConstructor
@Entity
public class Address {

    @Id
    @GeneratedValue
    private Long id;

    private String streetAddress;
    private @NonNull String city;
    private @NonNull String stateCode;
    private @NonNull String country;
    private @NonNull String zipCode;

    @ManyToOne
    @JsonBackReference
    private Customer customer;

}
@Data
@NoArgsConstructor
@RequiredArgsConstructor
@Entity
public class Customer {

    @Id
    @GeneratedValue
    private Long id;


    private @NonNull String firstName;
    private @NonNull String lastName;
    private @NonNull String emailAddress;

    @OneToMany(fetch = FetchType.EAGER, orphanRemoval = true, targetEntity = Address.class, cascade = CascadeType.ALL)
    @JoinColumn(name = "customer_id")
    @JsonManagedReference
    private List<Address> addresses;

    public void setAddresses(List<Address> addresses) {
        if(this.addresses == null) {
            this.addresses = new ArrayList<>();
        }else {
            this.addresses.clear();
        }
        this.addresses.addAll(addresses);
    }
}
@OneToMany and @JoinColumn are Hibernate annotations to specify relationship.
When you will save the customer records, hibernate will automatically create the customer record first, then create the address records, and then insert the customer_id as foreign key in the address records.
If you don’t specify the cascade type (cascade = CascadeType.ALL), while adding the @OneToMany annotation, then you may get following error when you save the Customer record.
org.hibernate.TransientObjectException:
object references an unsaved transient instance
- save the transient instance before flushing: com.dev.springdemo.customer.model.Address;
nested exception is java.lang.IllegalStateException: org.hibernate.TransientObjectException: object references an unsaved transient instance - save the transient instance before flushing: com.dev.springdemo.customer.model.Address
Above error may come when the Child object that is being added to the Parent, is not yet saved in the database. Adding a CascadeType.ALL, would solve the problem and you will not get the above error.
Then build and run the project again to verify if application is still running correctly.
[sunitc@sunit-hp spring-boot-demo-01]$ ./gradlew bootRun
If you get below error, then check if you have used the correct @Id annotation.
This error might come if you have used org.springframework.data.annotation.Id, instead of javax.persistence.Id.
org.springframework.beans.factory.BeanCreationException:
Error creating bean with name 'entityManagerFactory' defined in class path resource
[org/springframework/boot/autoconfigure/orm/jpa/HibernateJpaConfiguration.class]:

Invocation of init method failed; nested exception is org.hibernate.AnnotationException:
No identifier specified for entity: com.dev.springdemo.customer.model.Customer
3.2 Creating Repository
Now we will create the Repository or DAO classes.
Spring Data JPA repositories are interfaces that we can use to access data. JPA queries are created automatically from our method names.
For example, aCustomerRepository interface might declare a findAllByLastName(String lastName) method to find all the persons by lastName;
No implementation of above method is required.
Spring Data repositories usually extend from the Repository or CrudRepository interfaces. If we use auto-configuration, repositories are searched from the package containing your main configuration class (the one annotated with @EnableAutoConfiguration or @SpringBootApplication) down.
Refer to Spring Data Repository documentation for more information
To create the repository, create an interface that extends from
org.springframework.data.jpa.repository.JpaRepository
By default the JPARepository interface defines most of the CRUD methods like – findAll / findAllById / saveAll / deleteInBatch / getOne / save, etc.
You will also have to add the @Repository annotation to the interface.
@Repository
public interface CustomerRepository extends JpaRepository<Customer, Long> {

    //Contains search on either firstname or lastname
    List<Customer> findAllByFirstNameContainingOrLastNameContaining(String firstName, String lastName);
}
3.3 Creating Service API
Now lets create the API Implementation class, where you will
- autowire the CustomerRepository instance
- define a create / update / getById method
- annotate the class with @Service annotation
- create a findAll API with pagination support
@Service
public class CustomerService {

    //Autowiring the repository
    @Autowired
    private CustomerRepository customerRepository;

    //Get customer by Id
    public Optional<Customer> getCustomerById(Long customerId) {
       return customerRepository.findById(customerId);
    }

    //Create the customer
    public Customer create(Customer customer) {
        return customerRepository.save(customer);
    }

    //Update the customer
    public Customer update(Customer customer) {
        Optional<Customer> optionalCustomer = customerRepository.findById(customer.getId());
        if(optionalCustomer.isEmpty()) {
            throw new RuntimeException("Cannot find the customer by id " + customer.getId());
        }
        Customer existingCustomer = optionalCustomer.get();
        existingCustomer.setAddresses(customer.getAddresses());
        existingCustomer.setFirstName(customer.getFirstName());
        existingCustomer.setLastName(customer.getLastName());
        return customerRepository.save(existingCustomer);
    }

    //Find all customers by name
    public List<Customer> findByName(String name){
        return customerRepository.findAllByFirstNameContainingOrLastNameContaining(name, name);
    }

    //Paging implementation of findAll
    public Page<Customer> findAll(Pageable pageable) {
        return customerRepository.findAll(pageable);
    }
}
3.4 Creating Rest API
Now lets create a Rest Controller and define the Get, Post, Put APIs.
@RestController
@RequestMapping("/customer")
public class CustomerController {

    @Autowired
    private CustomerService customerService;

    @GetMapping(path = "/{id}", produces = MediaType.APPLICATION_JSON_VALUE)
    public ResponseEntity<?> getCustomerDetail(@PathVariable(name = "id") String customerId) {
        try {
            Long customerIdLong = Long.valueOf(customerId);
            Customer customer = customerService.getCustomerById(customerIdLong)
                    .orElseThrow(()->new RuntimeException("Unable to fetch customer record with id = " + customerId));
            return ResponseEntity.ok(customer);
        }catch(Exception ex) {
            return handleException(ex);
        }
    }

    @GetMapping(path = "/", produces = MediaType.APPLICATION_JSON_VALUE)
    public ResponseEntity<?> getAllCustomers(
            @RequestParam("pageNum") String pageNumber,
            @RequestParam("pageSize") String pageSize) {
        try {
            Integer pageNumberLong = Integer.valueOf(pageNumber);
            Integer pageSizeLong = Integer.valueOf(pageSize);
            //Create a new paginated search request.
            PageRequest pageRequest = PageRequest.of(pageNumberLong, pageSizeLong);
            Page page = customerService.findAll(pageRequest);
            return ResponseEntity.ok(page.getContent());
        }catch(Exception ex) {
            return handleException(ex);
        }
    }

    @PostMapping(path = "/", produces = MediaType.APPLICATION_JSON_VALUE, consumes = MediaType.APPLICATION_JSON_VALUE)
    public ResponseEntity<?> createCustomer(@RequestBody Customer customer) {
        try {
            Customer createdCustomer = customerService.create(customer);
            return ResponseEntity.created(new URI("/customer/" + createdCustomer.getId())).body(customer);
        }catch(Exception ex) {
            return handleException(ex);
        }
    }


    @PutMapping (path = "/{id}", produces = MediaType.APPLICATION_JSON_VALUE, consumes = MediaType.APPLICATION_JSON_VALUE)
    public ResponseEntity<?> updateCustomer(@PathVariable(name = "id") String customerId,  @RequestBody Customer customer) {
        try {
            customer.setId(Long.valueOf(customerId));
            Customer updatedCustomer = customerService.update(customer);
            return ResponseEntity.ok(updatedCustomer);
        }catch(Exception ex) {
            return handleException(ex);
        }
    }

    private ResponseEntity<ErrorMessage> handleException(Exception ex) {
        ex.printStackTrace();
        ErrorMessage error = new ErrorMessage(HttpStatus.BAD_REQUEST.value(), ex.getMessage());
        return ResponseEntity.badRequest().body(error);
    }
}
For handling errors, you will need to create a custom Error class, that is returned if any exception occurs. The class definition is as follows
@Data
@AllArgsConstructor
public class ErrorMessage {
    private int statusCode;
    private String errorMessage;
}
4.0 Running and Testing
Start the application
[sunitc@sunit-hp spring-boot-demo-01]$ ./gradlew bootRun
Now lets test the application.
The example given below make use of curl command to send HTTP REST request, from the command line. You can either use curl, or can use Postman or any other tool that you are comfortable with.
4.1 Testing Create Rest API
First lets create few customer records.
curl -i -X POST -H "Content-Type: application/json" http://localhost:8080/customer/ -d '{"firstName":"Clark","lastName":"Kent","emailAddress":"superman@gmail.com","addresses":[{"streetAddress":"3424 Brentwood Drive","city":"Austin","stateCode":"TX","zipCode":"78729","country":"USA"},{"streetAddress":"926 Park Avenue","city":"Rocklin","stateCode":"CA","zipCode":"95765","country":"USA"},{"streetAddress":"914 Still Street","city":"Fostoria","stateCode":"OH","zipCode":"44830","country":"USA"}]}'
curl -i -X POST -H "Content-Type: application/json" http://localhost:8080/customer/ -d '{"firstName":"Sonal","lastName":"Chatterjee","emailAddress":"sc@gmail.com", "addresses":[ {"streetAddress":"2400 Bridge Parkway","city":"Redwood Shores","stateCode":"CA","zipCode":"94065","country":"USA"}, {"streetAddress":"123 6th St.","city":"Melbourne","stateCode":"FL","zipCode":"32904","country":"Australia"}]}'
curl -i -X POST -H "Content-Type: application/json" http://localhost:8080/customer/ -d '{"firstName":"John","lastName":"Doe","emailAddress":"johndoe@gmail.com","addresses":[{"streetAddress":"4487 Elsie Drive","city":"Onida","stateCode":"SD","zipCode":"57564","country":"USA"}]}'
Now you should have 3 customer records created in your database.
4.2 Test Get All Customers
Now lets try to fetch all person records from the database
- You will need to pass the pageNum and pageSize as query params to the API.
- pageNum starts with 0
- pageNum=0, pageSize=2, will fetch record 1 and 2
- pageNum=1,pageSize=2, will fetch record 3, 4… and so on.
Remember, you have 3 customer records in the database.
You can call the paginated API with page size of 2, to get the first page of search results.
curl -i 'localhost:8080/customer/?pageNum=0&pageSize=2'
Output is as shown below
[
 {
   "id": 33,
   "firstName": "Clark",
   "lastName": "Kent",
   "emailAddress": "superman@gmail.com",
   "addresses": [
    {
      "id": 34,
      "streetAddress": "3424 Brentwood Drive",
      "city": "Austin",
      "stateCode": "TX",
      "country": "USA",
      "zipCode": "78729"
    },
    {
       "id": 35,
       "streetAddress": "926 Park Avenue",
       "city": "Rocklin",
       "stateCode": "CA",
       "country": "USA",
       "zipCode": "95765"
    },
    {
       "id": 36,
       "streetAddress": "914 Still Street",
       "city": "Fostoria",
       "stateCode": "OH",
       "country": "USA",
       "zipCode": "44830"
    }
   ]
 },
 {
   "id": 37,
   "firstName": "Sonal",
   "lastName": "Chatterjee",
   "emailAddress": "sc@gmail.com",
   "addresses": [
    {
      "id": 38,
      "streetAddress": "2400 Bridge Parkway",
      "city": "Redwood Shores",
      "stateCode": "CA",
      "country": "USA",
      "zipCode": "94065"
    },
    {
      "id": 39,
      "streetAddress": "123 6th St.",
      "city": "Melbourne",
      "stateCode": "FL",
      "country": "Australia",
      "zipCode": "32904"
    }
  ]
 }
]
You can now try fetching the second page of search results
curl -i 'localhost:8080/customer/?pageNum=1&pageSize=2'
Output will be
[
 {
 "id": 40,
 "firstName": "John",
 "lastName": "Doe",
 "emailAddress": "johndoe@gmail.com",
 "addresses": [
   {
    "id": 41,
    "streetAddress": "4487 Elsie Drive",
    "city": "Onida",
    "stateCode": "SD",
    "country": "USA",
    "zipCode": "57564"
   }
 ]
 }
]
4.3 Test Get Single Customer
If you call the GET API with wrong person ID,
curl -i http://localhost:8080/customer/36
you will get the following error Json
{
 "statusCode": 400,
 "errorMessage": "Unable to fetch customer record with id = 36"
}
Now call the GET API with correct person Id.
curl -i http://localhost:8080/customer/37
You will get the following output as result.
 {
  "id": 37,
  "firstName": "Sonal",
  "lastName": "Chatterjee",
  "emailAddress": "sc@gmail.com",
  "addresses": [
   {
     "id": 38,
     "streetAddress": "2400 Bridge Parkway",
     "city": "Redwood Shores",
     "stateCode": "CA",
     "country": "USA",
     "zipCode": "94065"
   },
   {
     "id": 39,
     "streetAddress": "123 6th St.",
     "city": "Melbourne",
     "stateCode": "FL",
     "country": "Australia",
     "zipCode": "32904"
   }
  ]
 }
This will bring us to the end of this article.
We have seen how to create Spring boot project from scratch and connect it to MySql database. We have also seen how to create entities, repositories, service and REST APIs to expose our objects.
In future articles we will look into how to add caching / security, etc to this project.
