
In this blog, we will demonstrate how to integrate Flyway into a Spring Boot application for managing database migration and database versioning.
Table of Contents
The entire code of for this project can be found at https://github.com/chatterjeesunit/spring-boot-app/tree/v2.0
To checkout this Release tag, run following command
git clone https://github.com/chatterjeesunit/spring-boot-app.git
cd spring-boot-app
git checkout tags/v2.0 -b v2.0-with-flyway
Note: The commands used in this article are run on Linux/Mac system, but similar commands will work on Windows system also. Additionally we have used IntelliJ Idea as an IDE in our example, but the same project can be setup on Eclipse also.
1.0 Introduction
In our previous blog, we demonstrated how to create a Spring Boot Application and run it.
However we had following configuration set in application.yaml
spring:
  jpa:
    hibernate:
      ddl-auto: update
Because of above configuration, Hibernate automatically created the tables for us in the database.
But there are few issues with this approach
- This is not recommended settings for production, as it can automatically alter the tables and cause issues.
- There is no way to identify when a schema change got introduced, i.e, database versioning and rollbacks are not easy to identify.
Ideally we would like to manually add scripts to control how the schema is generated in our database.
1.1 Why Flyway
There were few options available to us – Flyway, Liquibase, etc.
Both allow us to version control our database scripts (although the format varies), incrementally apply scripts to database, etc
There was one drawback with using Flyway – “Undo Migrations” or “Revert Scripts” require PRO version of Flyway which is expensive.
We still decided to go ahead with Flyway, because
- It is simple to configure and use
- We can add actual SQL scripts in source code repository.
In this blog, we will demonstrate integration with Flyway, but you can also choose to integrate Liquibase if that satisfies your requirements.
Below are few links on comparison of Flyway/ Liquibase
- https://medium.com/@ruxijitianu/database-version-control-liquibase-versus-flyway-9872d43ee5a4
- https://stackshare.io/stackups/flyway-vs-liquibase
1.2 Pre-requisites
- The code in this blog will be build on top of the sample application we created in our previous blog – How to Create a Spring boot project
- The starting code for this can be found at – https://github.com/chatterjeesunit/spring-boot-app/tree/v1.0
- The examples and code are for MySQL database, and you need to have MYSQL running on your machine along with a test database created on it.
2.0 Flyway Integration
2.1 Configurations
2.1.1 build.gradle
Modify the build.gradle and add following dependency for Flyway
compile "org.flywaydb:flyway-core:5.2.4"2.1.2 application.yaml
Change the hibernate configurations to stop creating/updating tables automatically. Now tables will have to be created via manual scripts.
Set spring.jpa.hibernate.ddl_auto to validate in application.yaml file
spring:
  jpa:
    hibernate:
      ddl-auto: validate
Add configurations for Flyway into the application.yaml file
spring:
  flyway:
    user: admin
    password: welcome
    url: jdbc:mysql://localhost:3306/test
    baseline-version: 0.0
    enabled: true
    locations: classpath:db/migration
    table: flyway_schema_history
    baselineOnMigrate: true
The complete list of Flyway Configurations can be found at following documentation. Some of the important ones are
- spring.flyway.url/user/password : This controls the database connection properties for flyway database. In our example we have kept it same as the Spring Boot application database, but it can be set to a different database.
- spring.flyway.enabled: Flyway migration runs only if this is set to true
- spring.flyway.locations: This is the location from where the database script files are loaded. By default it is the src/main/resources/db/migration
- spring.flyway.table: This the table where flyway migration history is recorded. By default it is flyway_schema_history
2.2 Creating SQL Scripts for migration
Lets create the SQL Scripts first.
- By default all SQL scripts will be placed in folder – src/main/resources/db/migration, unless the location is modified in application configuration.
- By default the script files will be named as : V<n>__<scriptname>.sql
Some examples are given below.- V1.0__CreateAllResource.sql
- V1.1__CreateIndex.sql
- V2.0__AlterTableForCustomer.sql
2.2.1 SQL Script for Customer Schema
Add below code to file – src/main/resources/db/migration/V1.0__CreateCustomer.sql
drop table if exists `customer`;
CREATE TABLE `customer` (
  `id` bigint(20) NOT NULL AUTO_INCREMENT ,
  `email_address` varchar(255) NOT NULL,
  `first_name` varchar(255) NOT NULL,
  `last_name` varchar(255) NOT NULL,
  PRIMARY KEY (`id`),
  KEY `idx_customer_fname` (`first_name`),
  KEY `idx_customer_lname` (`last_name`)
);
2.2.2 SQL Script for Address Schema
Add below code to file – src/main/resources/db/migration/V1.1__CreateAddress.sql
drop table if exists `address`;
CREATE TABLE `address` (
  `id` bigint(20) NOT NULL AUTO_INCREMENT,
  `city` varchar(255) NOT NULL,
  `country` varchar(255) NOT NULL,
  `customer_id` bigint(20),
  `state_code` varchar(255) NOT NULL,
  `street_address` varchar(255) DEFAULT NULL,
  `zip_code` varchar(255) NOT NULL,
  PRIMARY KEY (`id`),
  KEY `idx_address_customer_id` (`customer_id`),
  FOREIGN KEY `fk_address_customer_id` (customer_id) REFERENCES customer(id) ON DELETE RESTRICT ON UPDATE RESTRICT
);
2.3 Running migration
Drop ALL tables from existing database OR Drop and re-create the database
This will ensure the the application starts on clean database.
Start the Spring boot application.
You may get this error on starting the application – Caused by: org.hibernate.tool.schema.spi.SchemaManagementException: Schema-validation: missing table [hibernate_sequence]
This happens because we have used @GeneratedValue() on some of the entities without specifying the sequence to use. So, Hibernate tries uses the default sequence: hibernate_sequence.
But the hibernate_sequence, is not created because spring.jpa.hibernate.ddl_auto has been set to validated.
To fix this, change the following in the ID fields for both the entities – Address and Customer.
    @Id
    @GeneratedValue(strategy = GenerationType.IDENTITY)
    private Long id;
Build and run the application again.
2.4 Verifying the migration in DB
Now lets verify if the migration was successfully done.
2.4.1 Verify in the DB
Verify that the following three tables have been created.

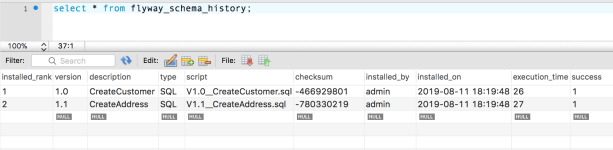
Additionally verify that the migration entries for both the scripts have been created into the schema – ‘flyway_schema_history‘
2.4.2 Verify application working correctly
Execute some of the REST APIs to test the application.
curl -i -X POST -H "Content-Type: application/json" http://localhost:8080/customer/ -d '{"firstName":"John","lastName":"Doe","emailAddress":"johndoe@gmail.com","addresses":[{"streetAddress":"4487 Elsie Drive","city":"Onida","stateCode":"SD","zipCode":"57564","country":"USA"}]}'curl -i 'localhost:8080/customer/?pageNum=0&pageSize=2'Full set of REST APIs are given in previous blog section here
3.3 Troubleshooting
The biggest issue with Flyway Community version is that, there is no option for UNDO migrations. Consider a situation
- We created a script with 4 Create table SQL statements.
- The script failed after execution of 2 entries.
- So the tables that got created by first two statements will not be rolled back.
- We now fix the complete script.
- Flyway will run the script again, and now the the script will fail because the first two tables already exists.
Possible Solutions
- Manually revert the entire script, before initiating flyway migration again.
- Make sure DDL scripts are re-runnable in ‘Check and Execute’ mode. E.g Instead of just writing a Create table statement, write a logic that checks if table exists and only tries to create if it does not exists.
This will bring us to the end of this blog.
In future articles we will look into how to add authentication, auditing, caching, etc to this Spring boot application.

Using Flyway for Managing Database Migrations in Spring Boot3, Maven + MySQL
https://youtu.be/3ts61KR6v5g
LikeLike